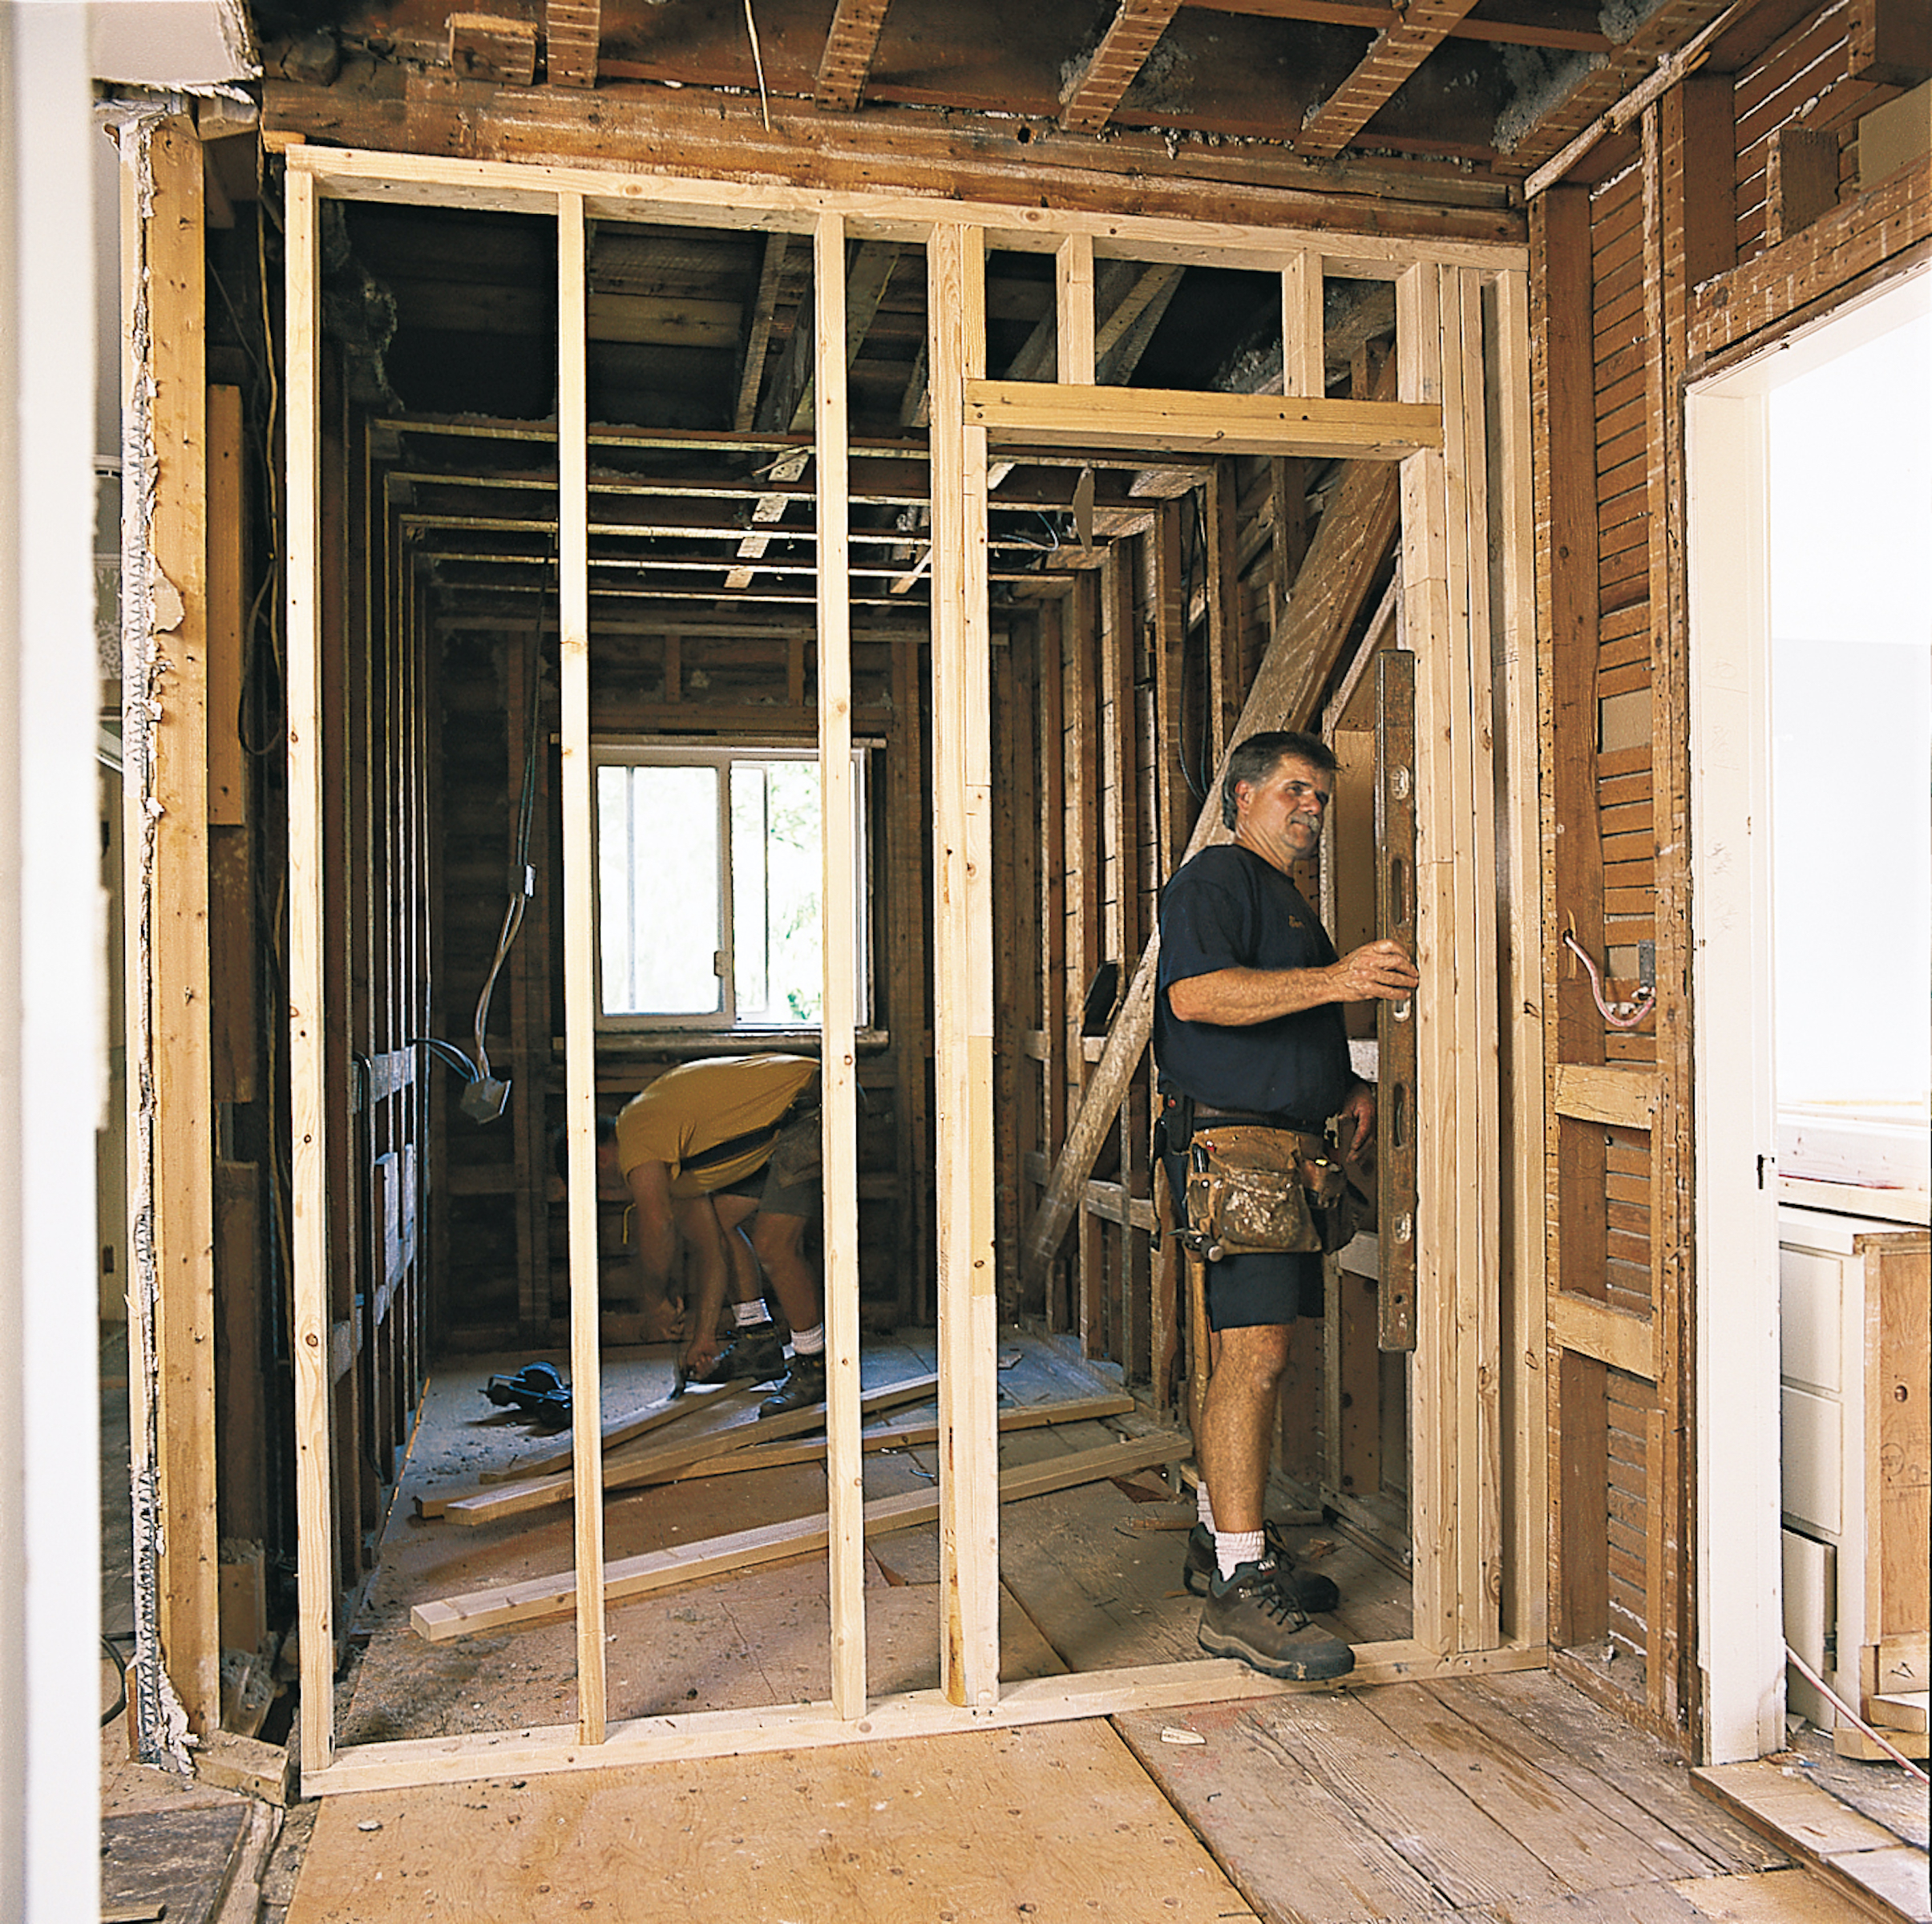
In addition to writing posts about the history of the house and the steps we’re taking to renovate it, I’m also going to write periodic posts explaining how I do things. Here I’m going to go through how I did some of the door framing, focusing on the downstairs bathroom.
As an aside, the demands of the actual renovation have meant that the blog posts are not keeping up with the work we are doing. Bear with us—we’ll catch up eventually!
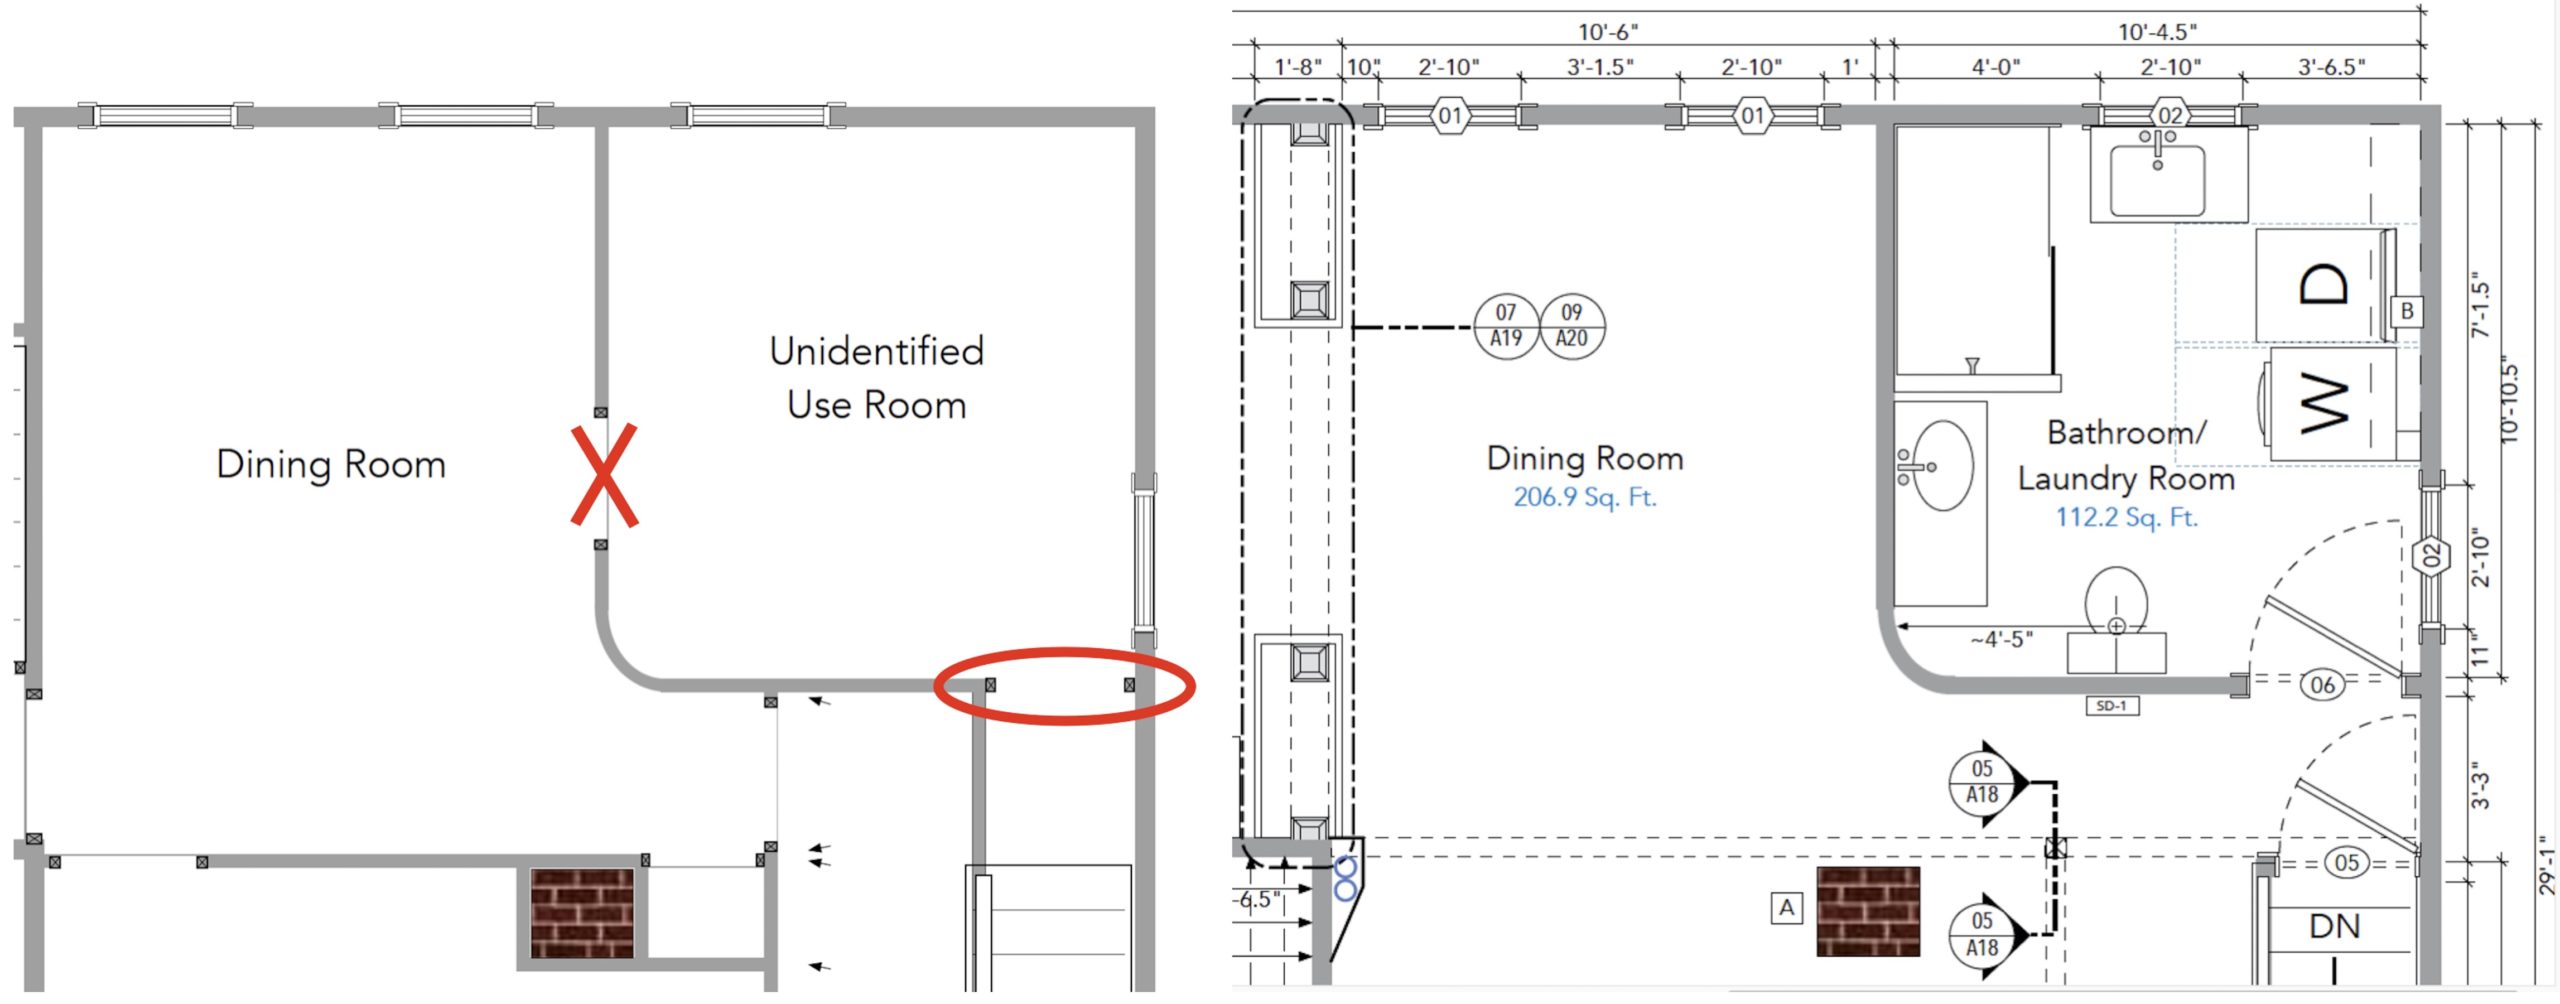
For this project, I had to reframe one existing door by creating a new rough opening to enlarge it from 30” wide to 36”. (The opening in the framing that accommodates a door or a window is called the “rough opening,” or “RO” when written.)
I also had to close off the opening for the other original door, that had opened into the dining room.
A Matter of Terms
But before I get into the work I did, first a little terminology.
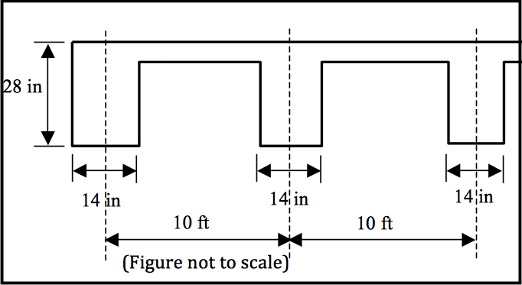
Traditionally, carpenters’ terminology was often localized, becoming more standardized as time went by. However, that standardization has been only partial. For example, some framing components are still known by different names, so what you call them depends on who you learn them from.
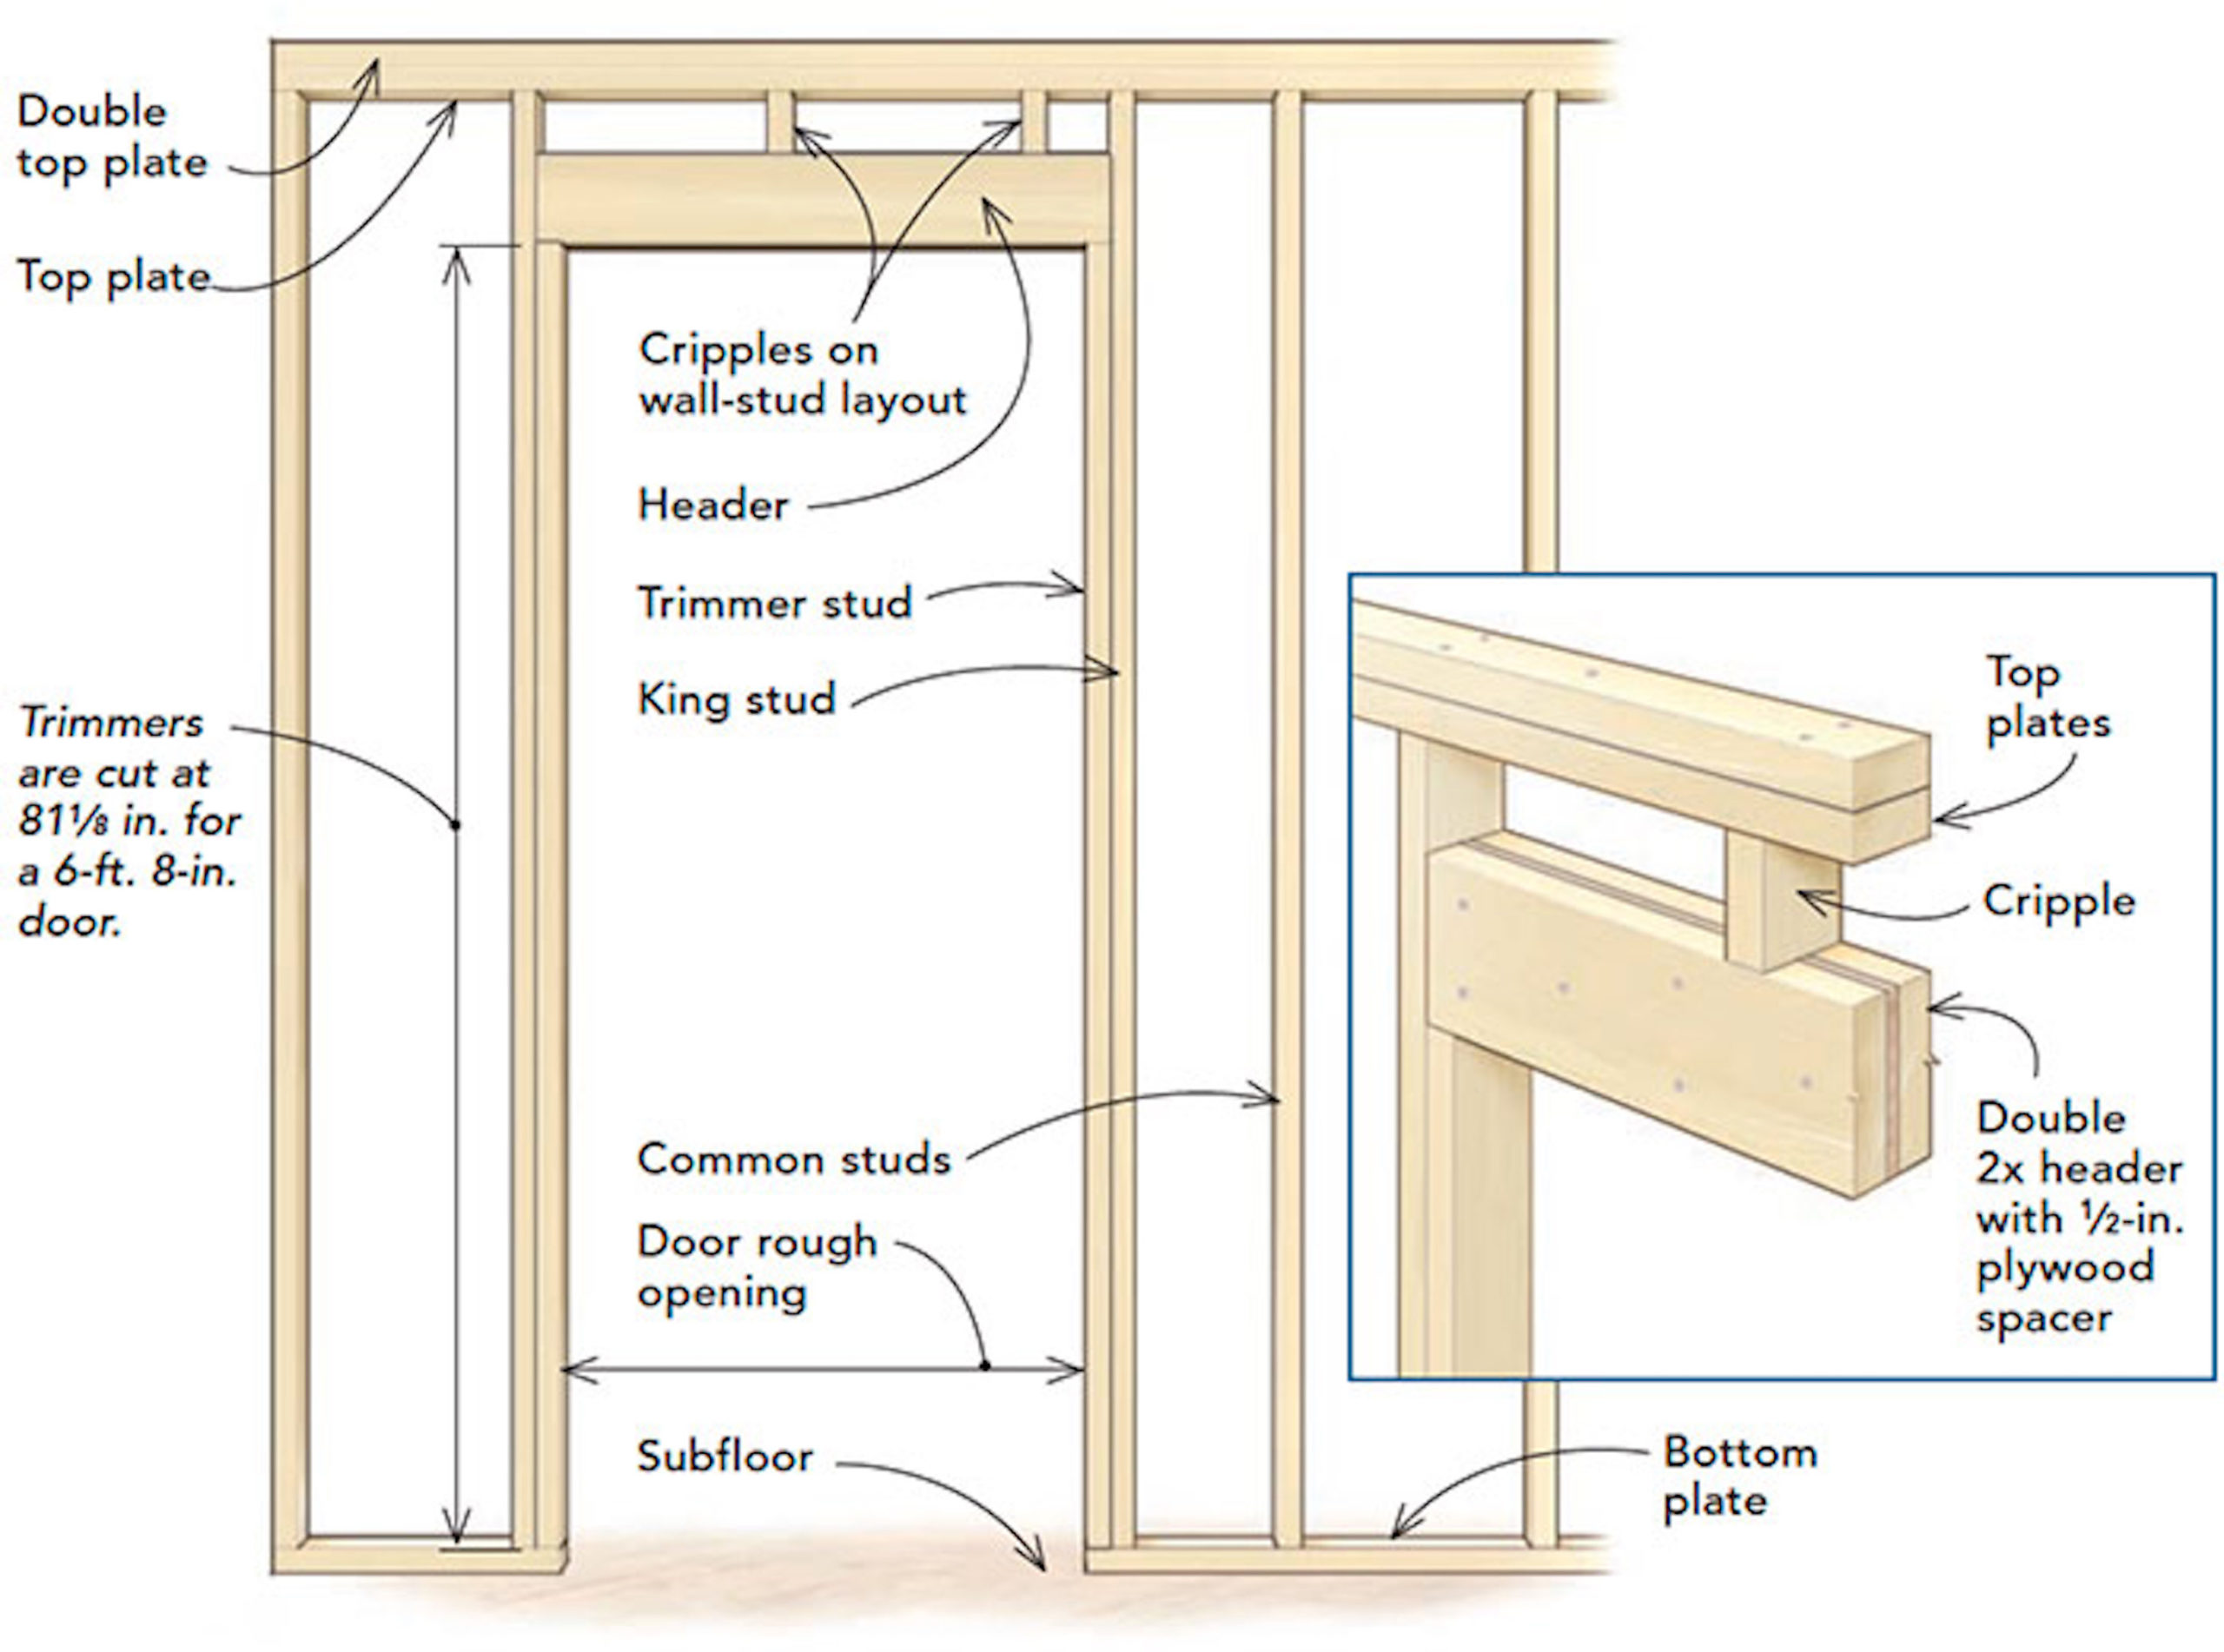
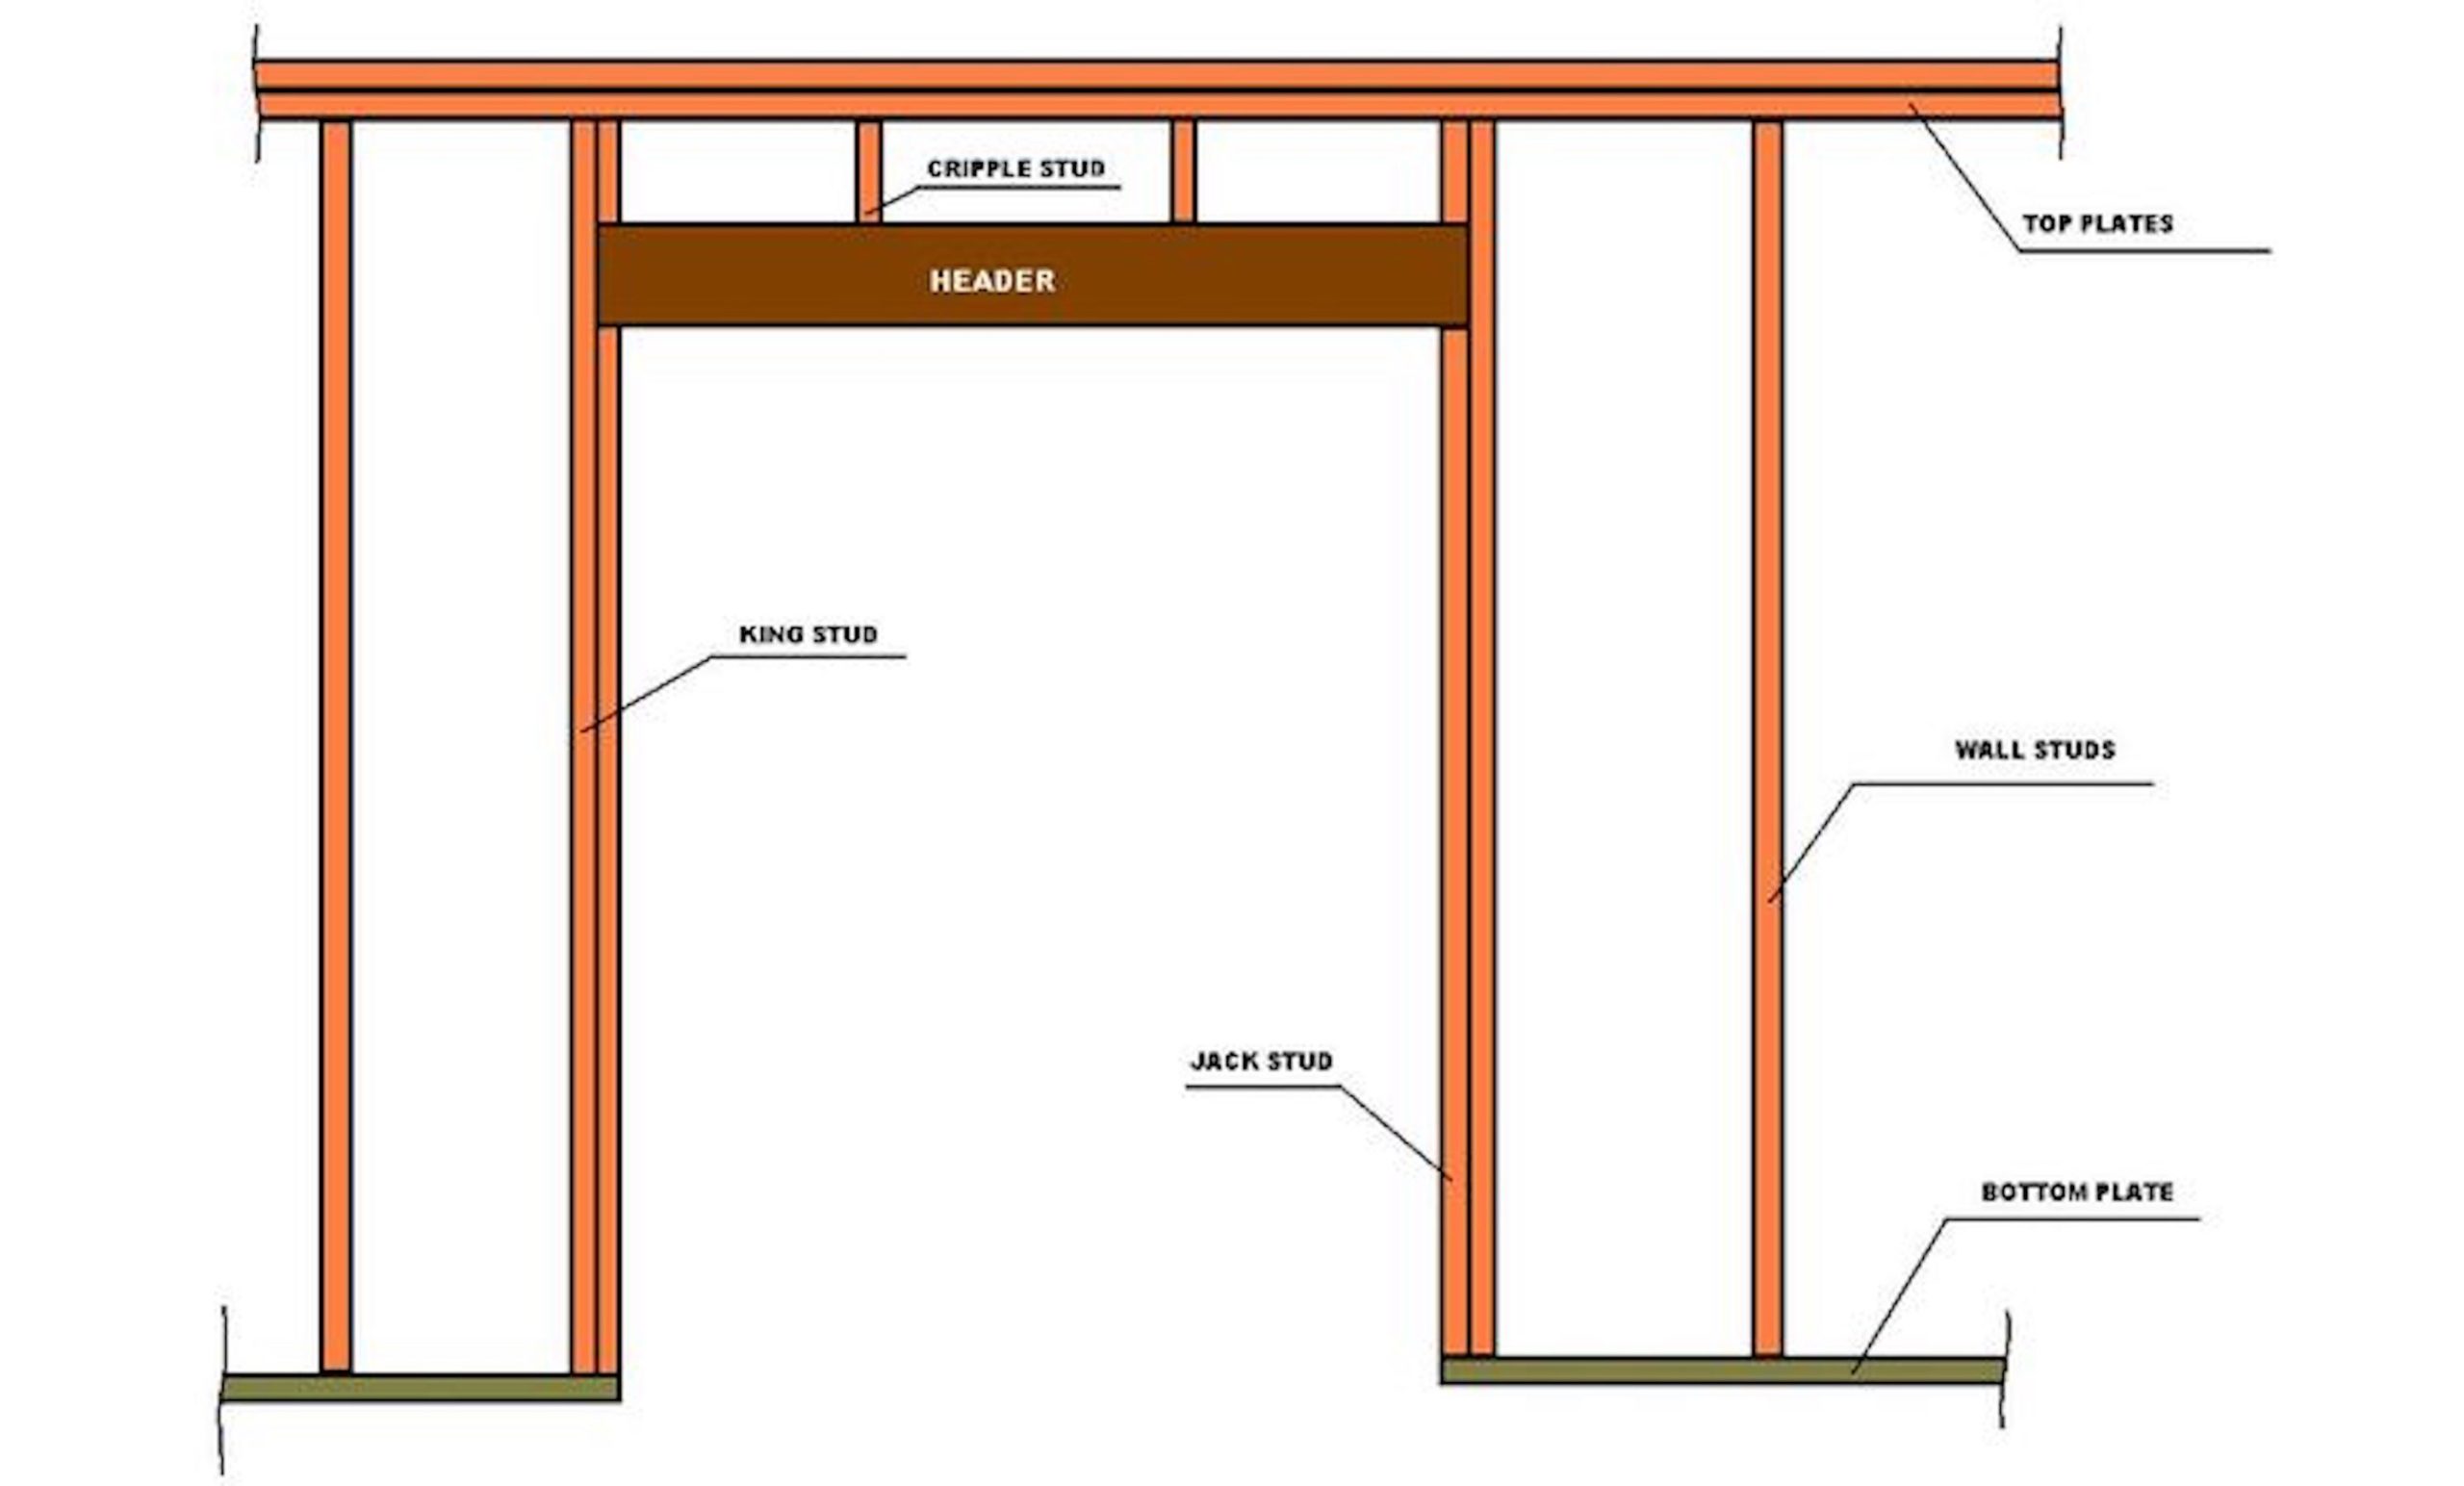
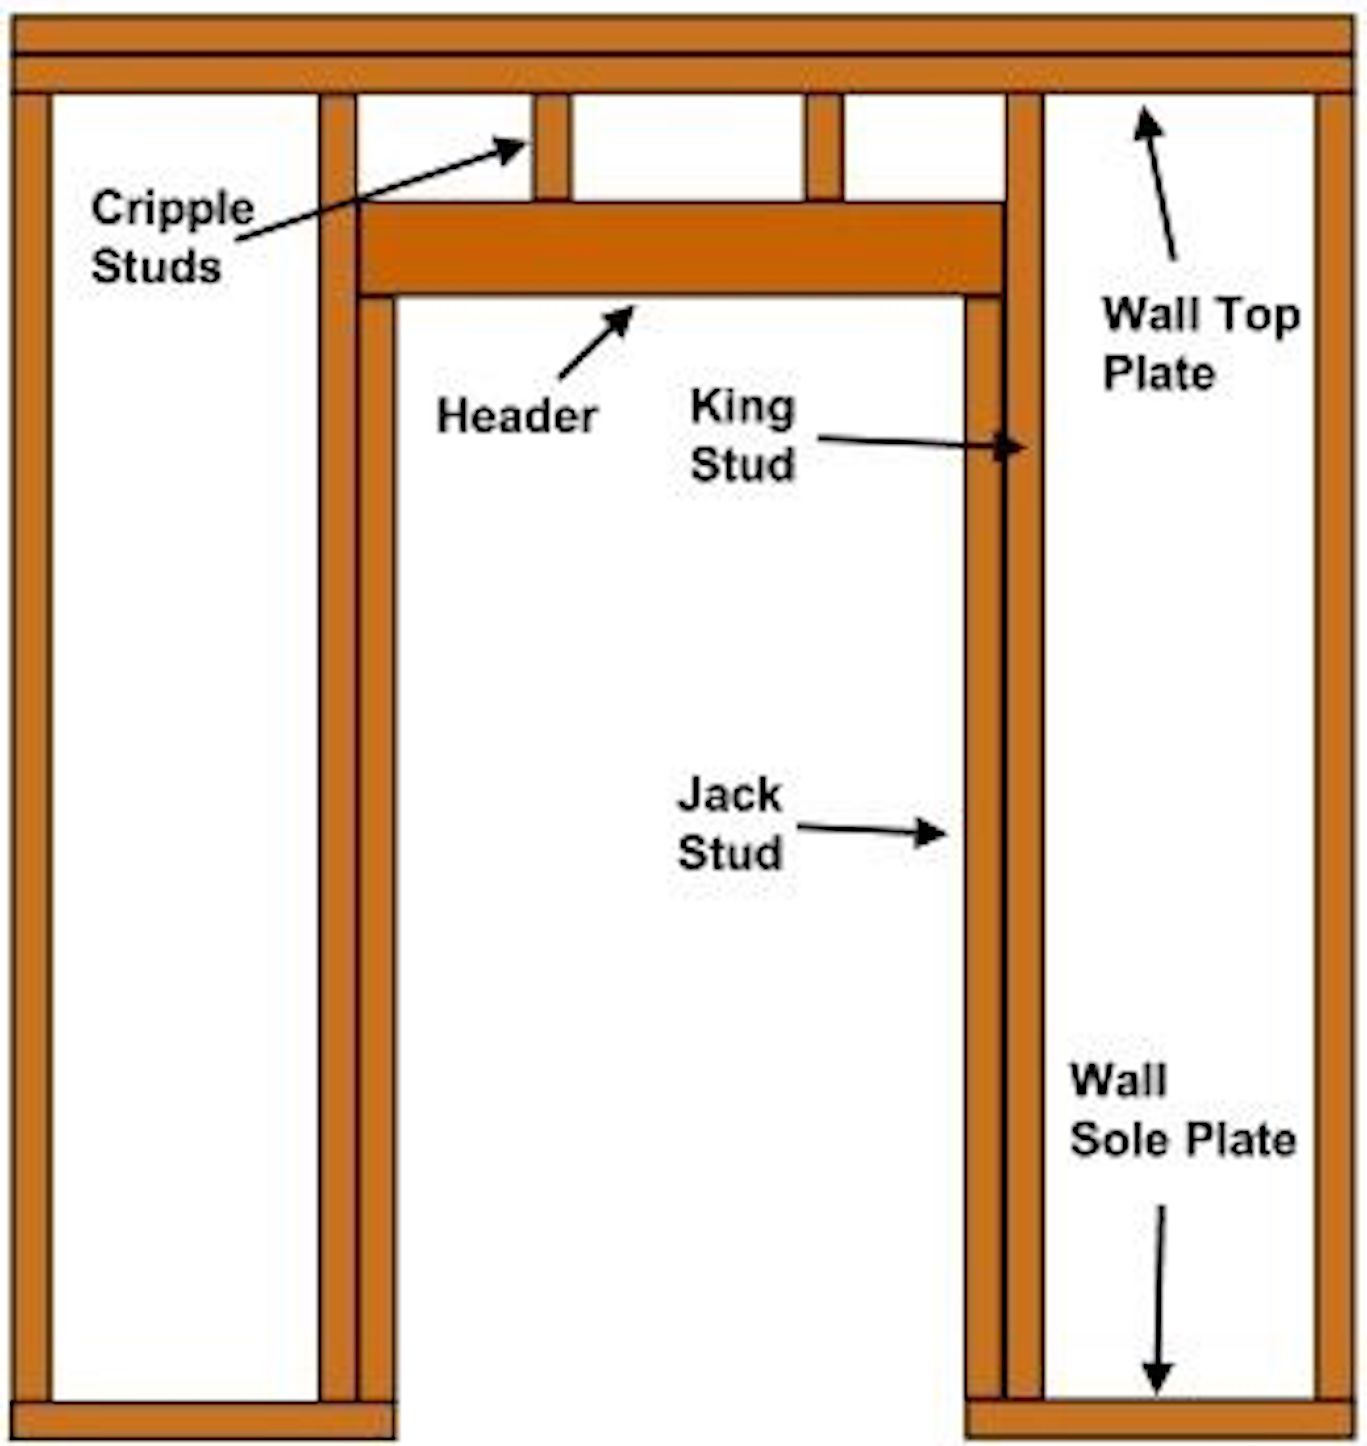
For example, what the graphic above calls a “bottom plate” is also known as a “sole plate” or “a toe plate”. I’ve been on sites where it was called all three. I myself have a nasty habit of going back and forth between the terms without even realizing it—sometimes in the same sentence, much to the confusion of my audience. (I even did it in this post, but Linda noticed, thought it would be confusing, and reworked them all to be consistent.)
Likewise, what the graphic calls a “trimmer stud” I know as a “jack” stud—the term I will use, because it works better with the term “king stud”. (I’ve often wondered what happened to the “queen stud”, only to have it pointed out that she’s the one asking whether I’ve finished this blog entry yet!)
Scott Grice of Fine Homebuilding writes, “If you can cut a 2×4 and drive a nail, then you have all the skills you need to frame door rough openings. As with most home-building tasks, however, there’s a fine line between getting it done and doing it efficiently, without causing headaches down the line.”
Grice’s article is good—although he does have the quirky habit of using a hatchet as a hammer.
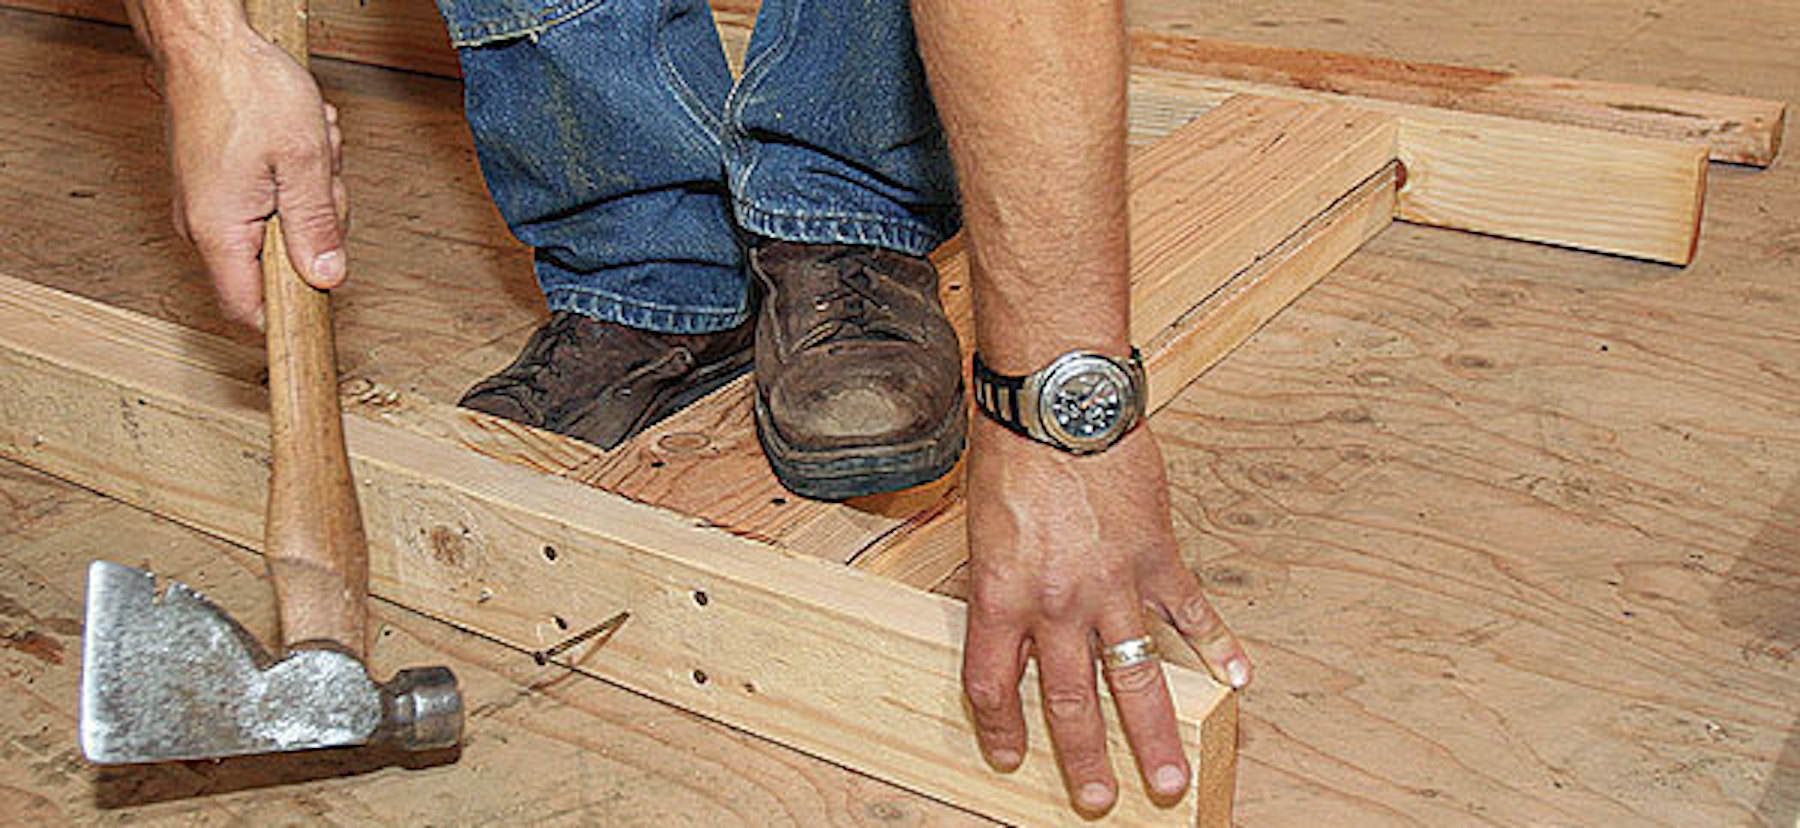
Not something I’d recommend for the amateur— you’d need to devote too much attention to where the sharp end of the hatchet is swinging! I imagine Grice can do it effectively (and safely), because someone who has swung a hammer day-in and day-out for years develops an instinctive awareness of where the claw (or in his case, the blade) is.
Also (not a criticism, just a footnote), because Grice’s article was published in 2009, the nailing schedule he uses is now out of date, and would not pass a code inspection by a current building inspector. (“Nailing schedule” refers to the requirements for the size, placement, and number of nails to use for a particular application.)
With the adoption of the International Residential Codes for one- and two-family dwellings, nailing schedules have changed in most locations. So, before starting a project, check your local building codes. I’ve had to relearn how to nail things myself, having originally learned my framing skills thirty-five years ago.
Rough Framing a Door
I’m going to start by describing the process for adding the rough framing for a door. That will greatly simplify the description for closing one up.
First, you need to determine and verify the specific measurements of where you want to put the door. Don’t just rely on your building plans—even when, as in this case, I myself had drawn the original plans. I often find that no matter how carefully I measure, I’ve still had to tweak things to accommodate conditions on-site. Or, to put it another way, I need to make my imagined world conform to the real one.
When is a 2×3 not a 2×3?
For the record, I’m re-using 2×3’s that Linda and I salvaged from elsewhere in the house.
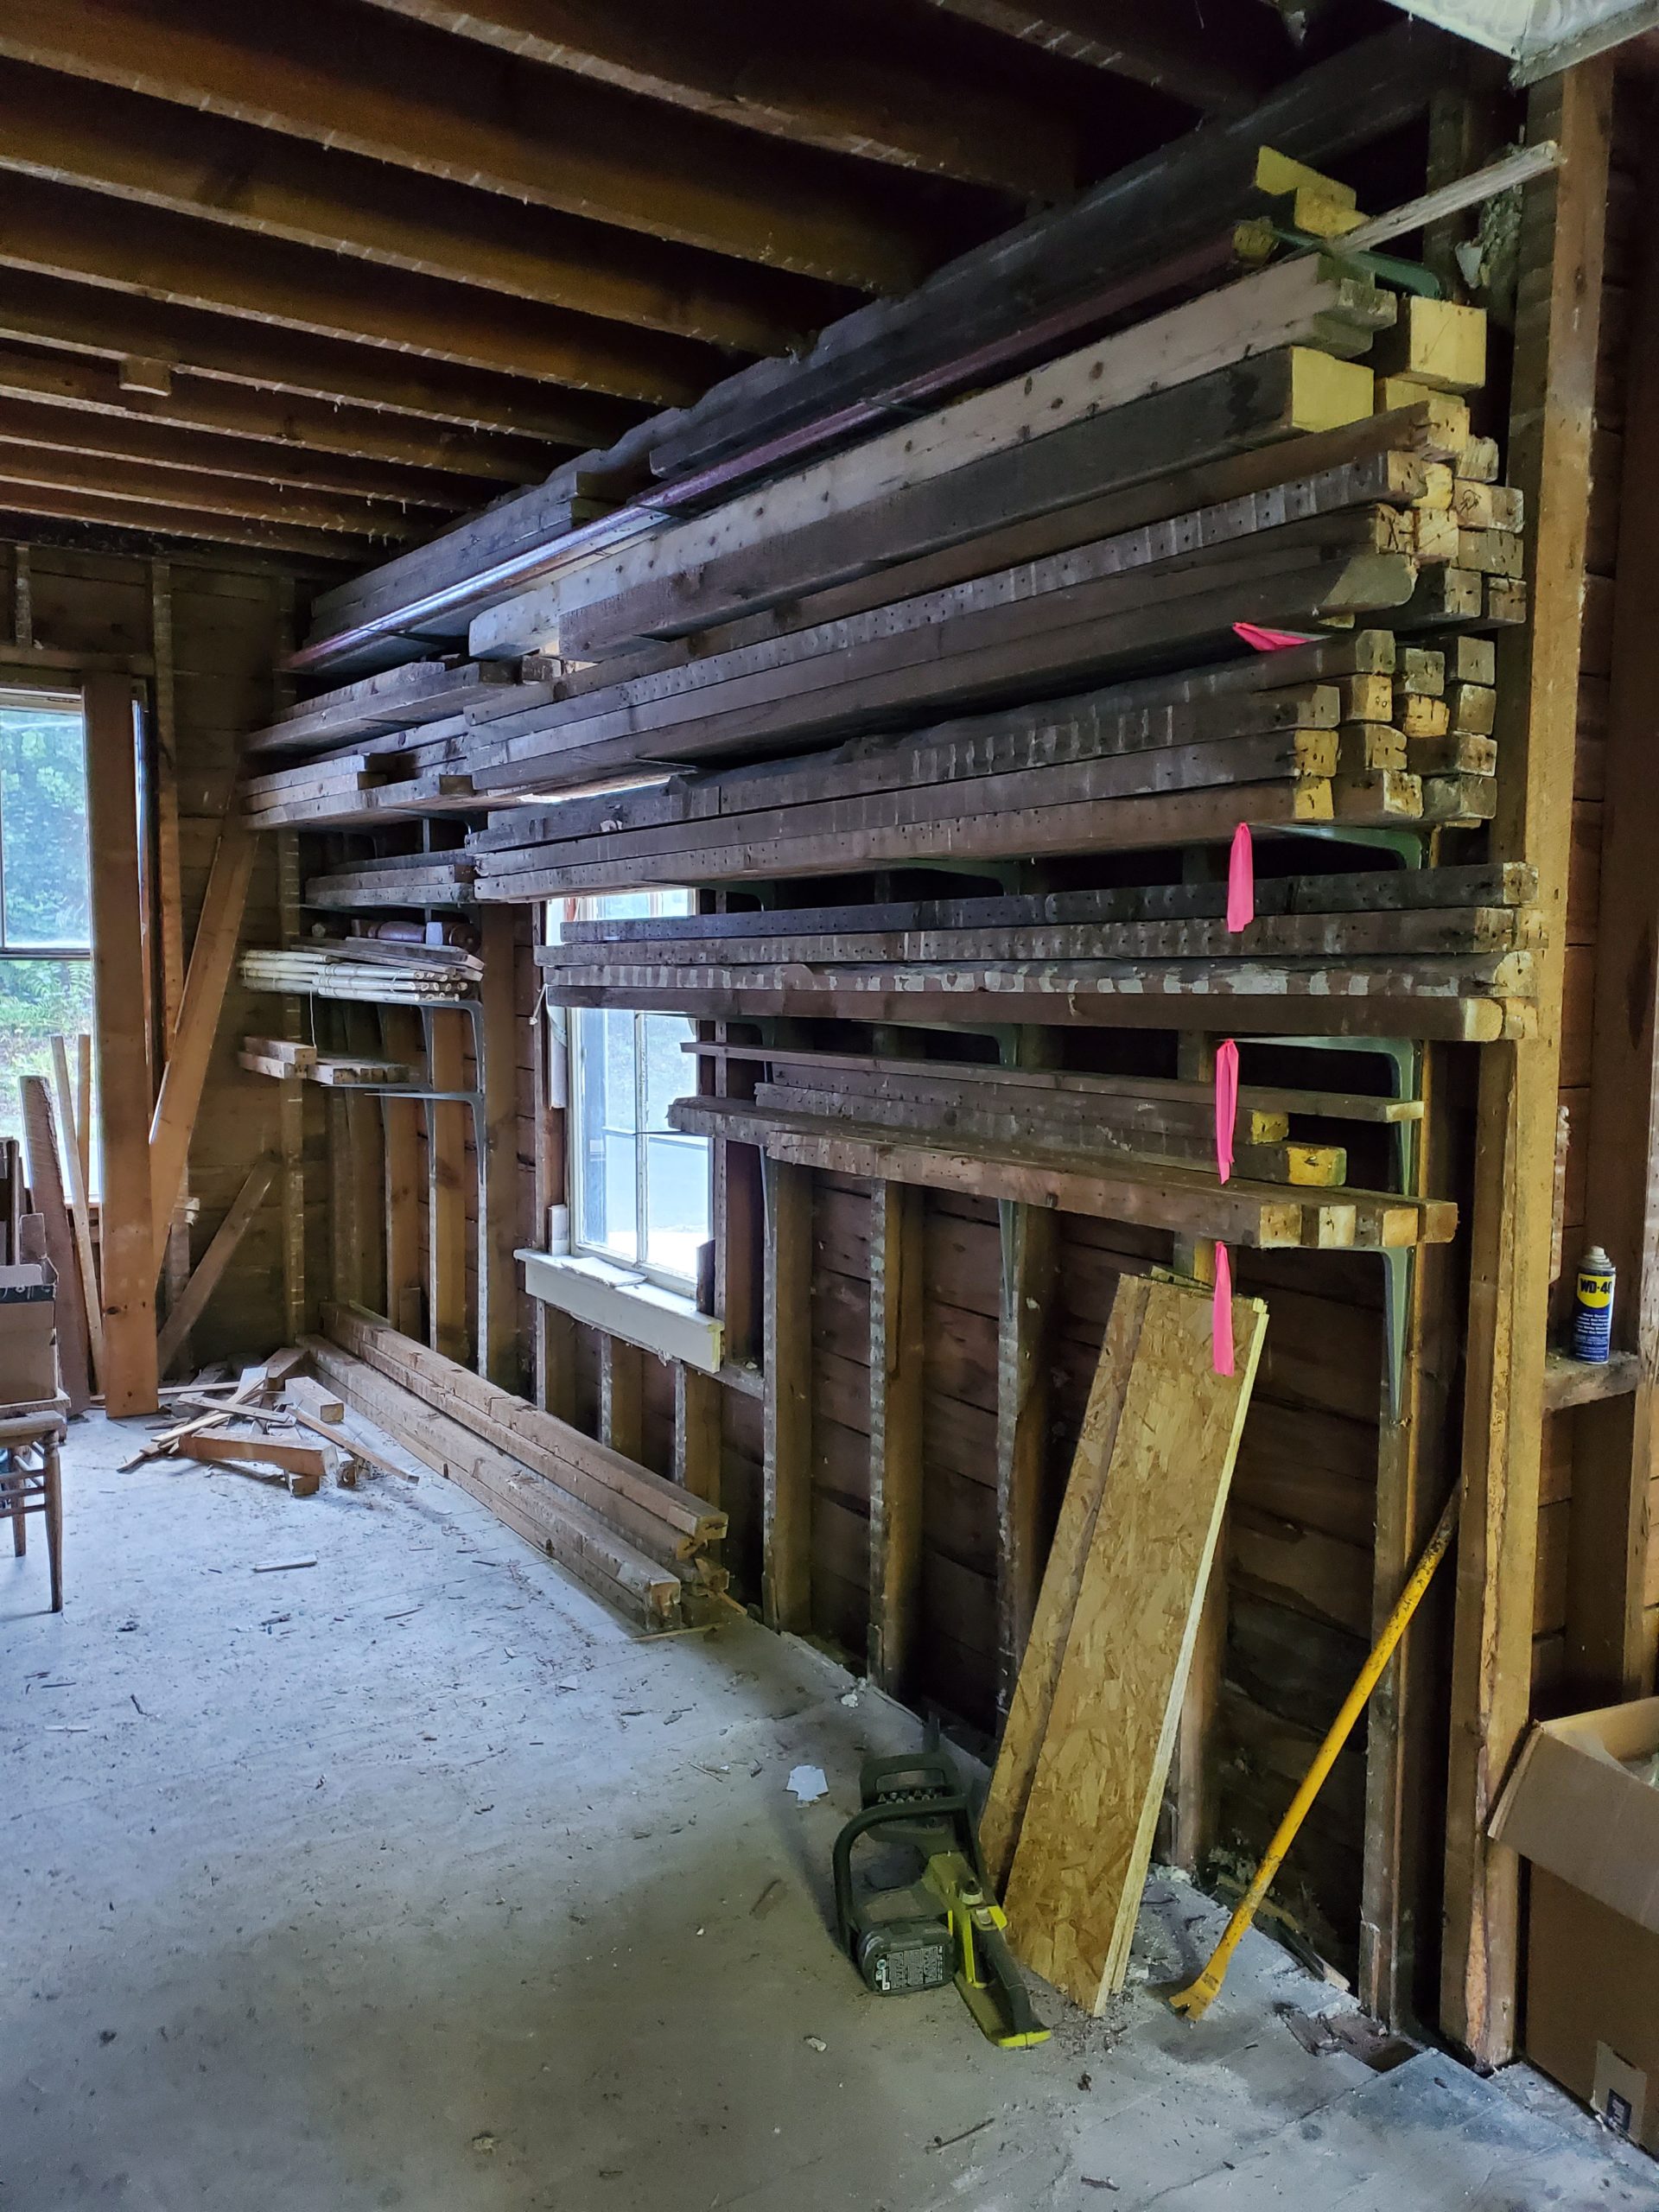
I can use this lumber because I’m building within the framing of an existing wall that isn’t “load-bearing”. That is, it doesn’t support the weight of the house above it. Moreover, by using original 2×3’s, the dimensions of the lumber I add will more closely match the size of what is already there.
Why wouldn’t a modern 2×3 be the same as an antique 2×3? Because “2×3” in modern terms is a “nominal” measurement. That means that the wood was 2” x 3” when it originally sawn from the tree. However, it was then dried, which caused it to shrink slightly in size, while also distorting its shape.
The wood is then run through a series of machines to even the thickness and resaw it. It becomes a piece of lumber with consistent dimensions that is mostly straight (that is, straight within “acceptable” tolerances). The final measurements are actually 1-½” by 2-½”.
In contrast, our old lumber from the house is generally 1-¾” to 2” thick and 2-¾” wide. So, although it isn’t a full 2×3, it still comes closer than modern boards do.

Matters of Placement
Suppose you are building your door opening near an adjacent wall. It may sound like a minor detail, but you have to position the studs and the opening to leave room for the door knob when the door is open. Otherwise, the door will not open completely. Plus, you run the risk of the knob’s punching a hole in the wall.
Most door knobs stick out about 3 inches, which works out well, since the two studs and the door jamb should measure about 4 inches. I still prefer to leave at least 5 inches. Since the old salvaged 2X3’s I’ll use for this wall are generally 1-¾” to 2” in thickness instead of 1-½”, getting 5” for my clearance will be easy.
On Placing Studs
When you determine where your door will be placed, that will tell you where to position both of your king studs. These will extend from the bottom plate (the horizontal framing member attached to the subfloor) to the top plate, just below the joists.
In the case of this bathroom door, I had to attach the first king stud to the north wall of the house. To do so, I had to install blocking between the existing studs, and nail the king stud to them.
The next step is to create the actual door opening by measuring out the spacing for your other studs.
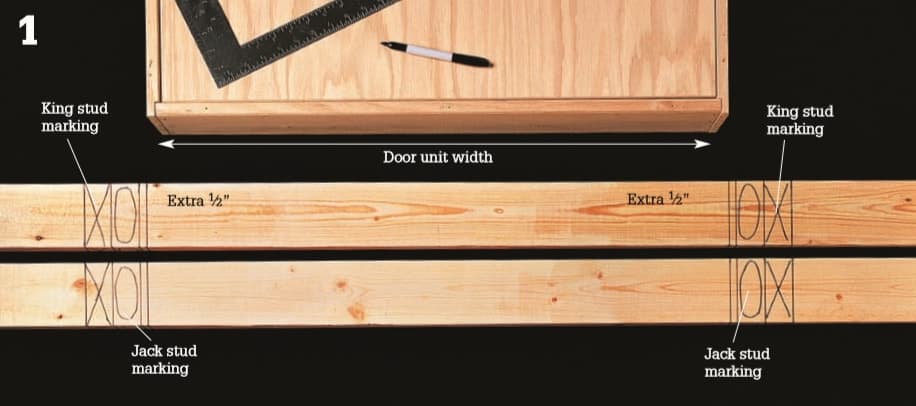
We will be installing a 36” door. On the bottom plate, starting from the bottom edge of the king stud, I first measured out the thickness of my jack stud. I then added another 38” to factor in the space for the door, plus 2” for the door jambs. That point gave me the inside edge of my second jack stud.
Having laid out where both the jack and the king studs on that side would go, I installed the second king stud.
To explain in a little more detail: The RO width for an interior door equals the width of the actual door, plus 2”.
These 2” give you room for a ¾”-thick door jamb on either side of the door, and a ¼” gap between the jamb and the door. Why? To give you a small margin for adjustments when hanging the door, in case the framing ends up not being completely plumb.
Getting to Plumb
In an ideal world, when houses are built, the framing and walls end up plumb. “Plumb” means that the studs—and eventually the walls—run straight up and down at a true vertical.
Unfortunately, many houses these days don’t stay either plumb or level, because their foundations settle. When that happens, walls shift their alignment and floors dip. Builders who knock things together to get on to the next job only compound the problem. That’s just the nature of the beast. Which is not to say that it is inevitable.
Sometimes, when I have gone in to measure a space for a built-in project—say, a 7’x2’ area within a room—I have seen as much as a three-quarter-inch difference in the height of each of the four corners of the span. And no, I don’t mean the four corners of the room, but of the fourteen-square-foot section where the built-in will go.
Given all that, you can’t begin to imagine how flabbergasted I was when I took out my level and put it against a stud in this 186-year-old house. The stud was still plumb. One-hundred-and-eighty-six years old, and still plumb.
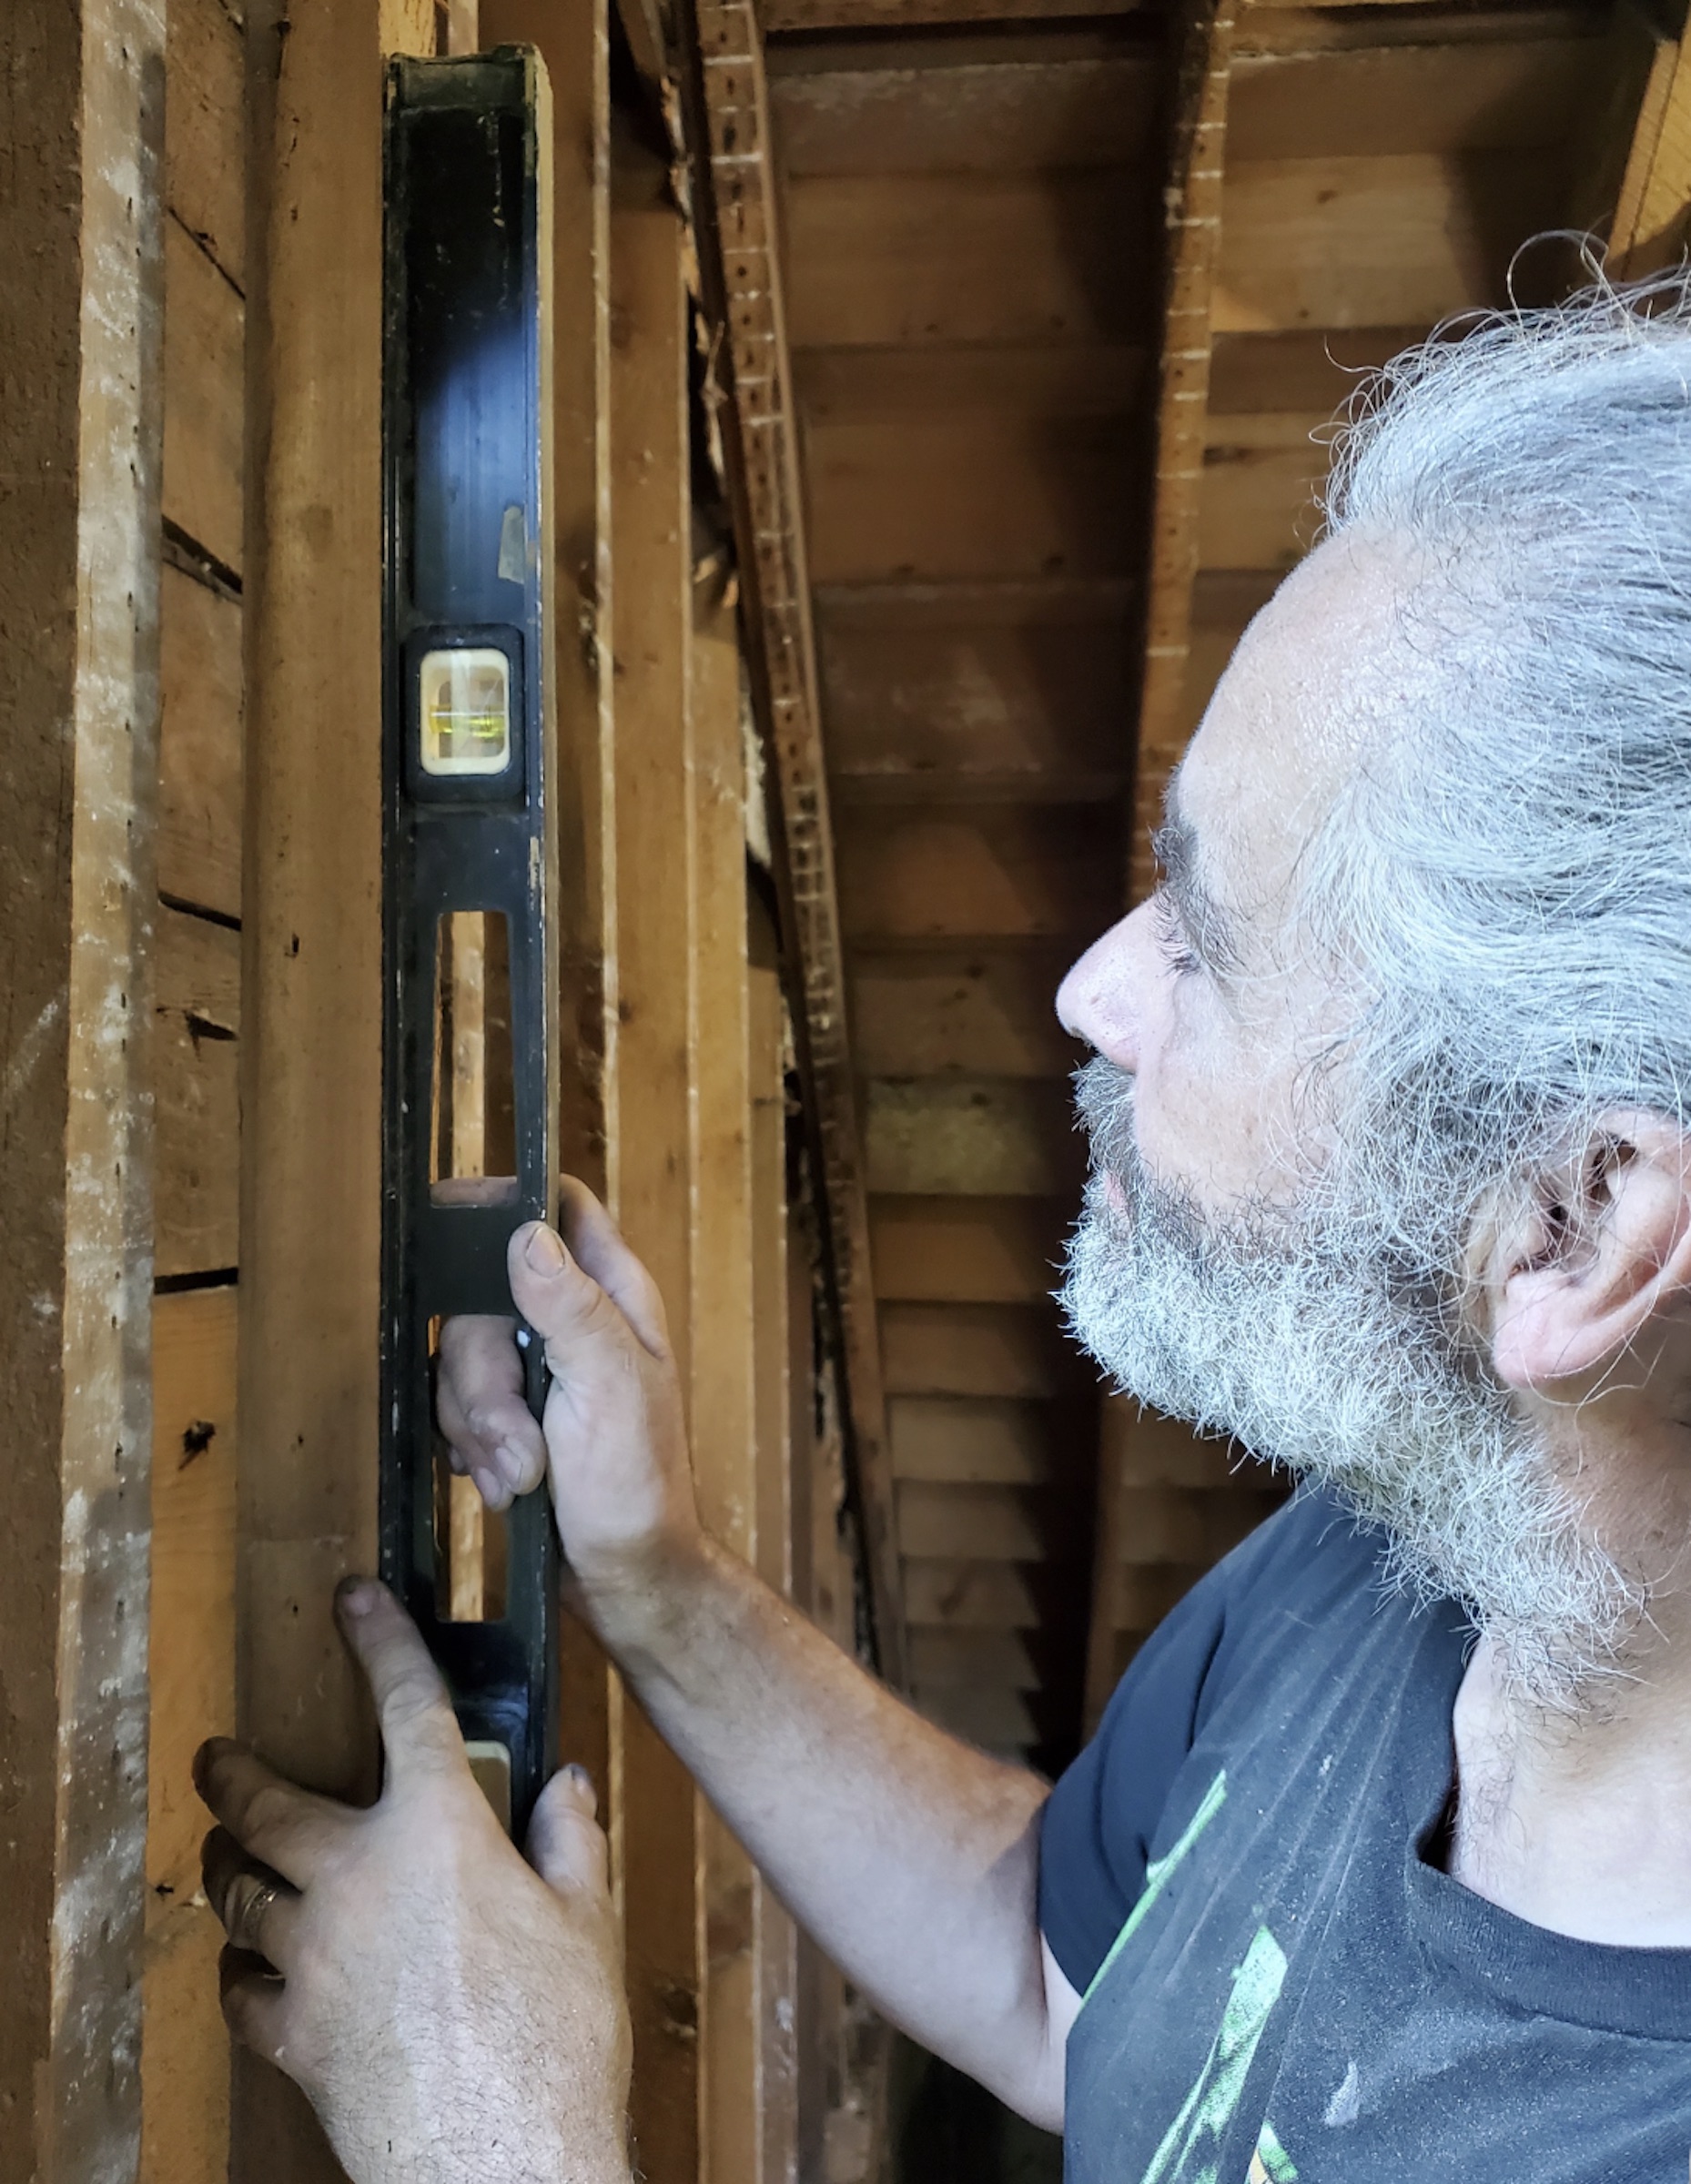
I was even more amazed when I put the level on another side of the same stud. It was plumb in that direction as well.
Not only that, but the floors are also almost level. When I say “almost”, I’m talking about maybe a single quarter of an inch difference in height over a twenty- or thirty-foot span. This is absolutely unheard of by today’s construction standards, even in a brand-new house. We presumably have John Hayes Thompson to thank—or whoever the carpenter was who framed and built the house for him. They did not cut corners.
Plumb Bobs & Levels
The traditional way to ensure that your vertical lines are plumb is to use a Plumb Bob. A plumb bob is a carpentry tool used to show if something is straight (or “plumb”). By hanging vertically, plumb bobs use gravity to determine straightness.
To make sure that your horizontal lines are equally straight, you use a level. Today, we have “spirit levels” (often just called “levels”) in lengths of up 12 feet, or laser levels that can shoot a line using a laser as far as you can see it.
Most of you probably have at least one door in your home that swings open or closes by itself, even if just a little. This is the result of the door not being plumb, and can be caused by either a house settling or an improperly installed door.
The improperly installed door is the bane of finish carpenters. Yes, you might be able to shim the hinges, but chances are you will never fully eliminate that swing in the door if it was not installed plumb.
Even a sixteenth of an inch can make all the difference which is why you leave this ¼” gap on each side (for a total of ½”). It lets you plumb the door itself, even if the framing is a little off.
Figuring the Height of Your Rough Opening
Determining the rough height of a door is a less direct process, but is also not quite as crucial if you make it a little taller than it needs to be.
First, calculate the total thickness of everything covering the subfloor, underneath the bottom of the door.
One example is the thickness of your underlayment and of your actual flooring.
What is underlayment?
…a thin layer of material such as fiber, felt, rubber or foam. The thin layer of material helps cushion, sound absorption, insulation and reduce wear with your flooring. For laminate or engineered wood flooring, it provides a “vapor barrier” to prevent moisture from coming through and damaging your floor.
Scott DeBoer (2019)
The thickness of your underlayment-plus-flooring could mean rosin paper and hardwood. Or, it could mean a cement board underlayment with a radiant heat mat covered with tile. If you put padding and carpet on top of your hardwood, you would include that added thickness.
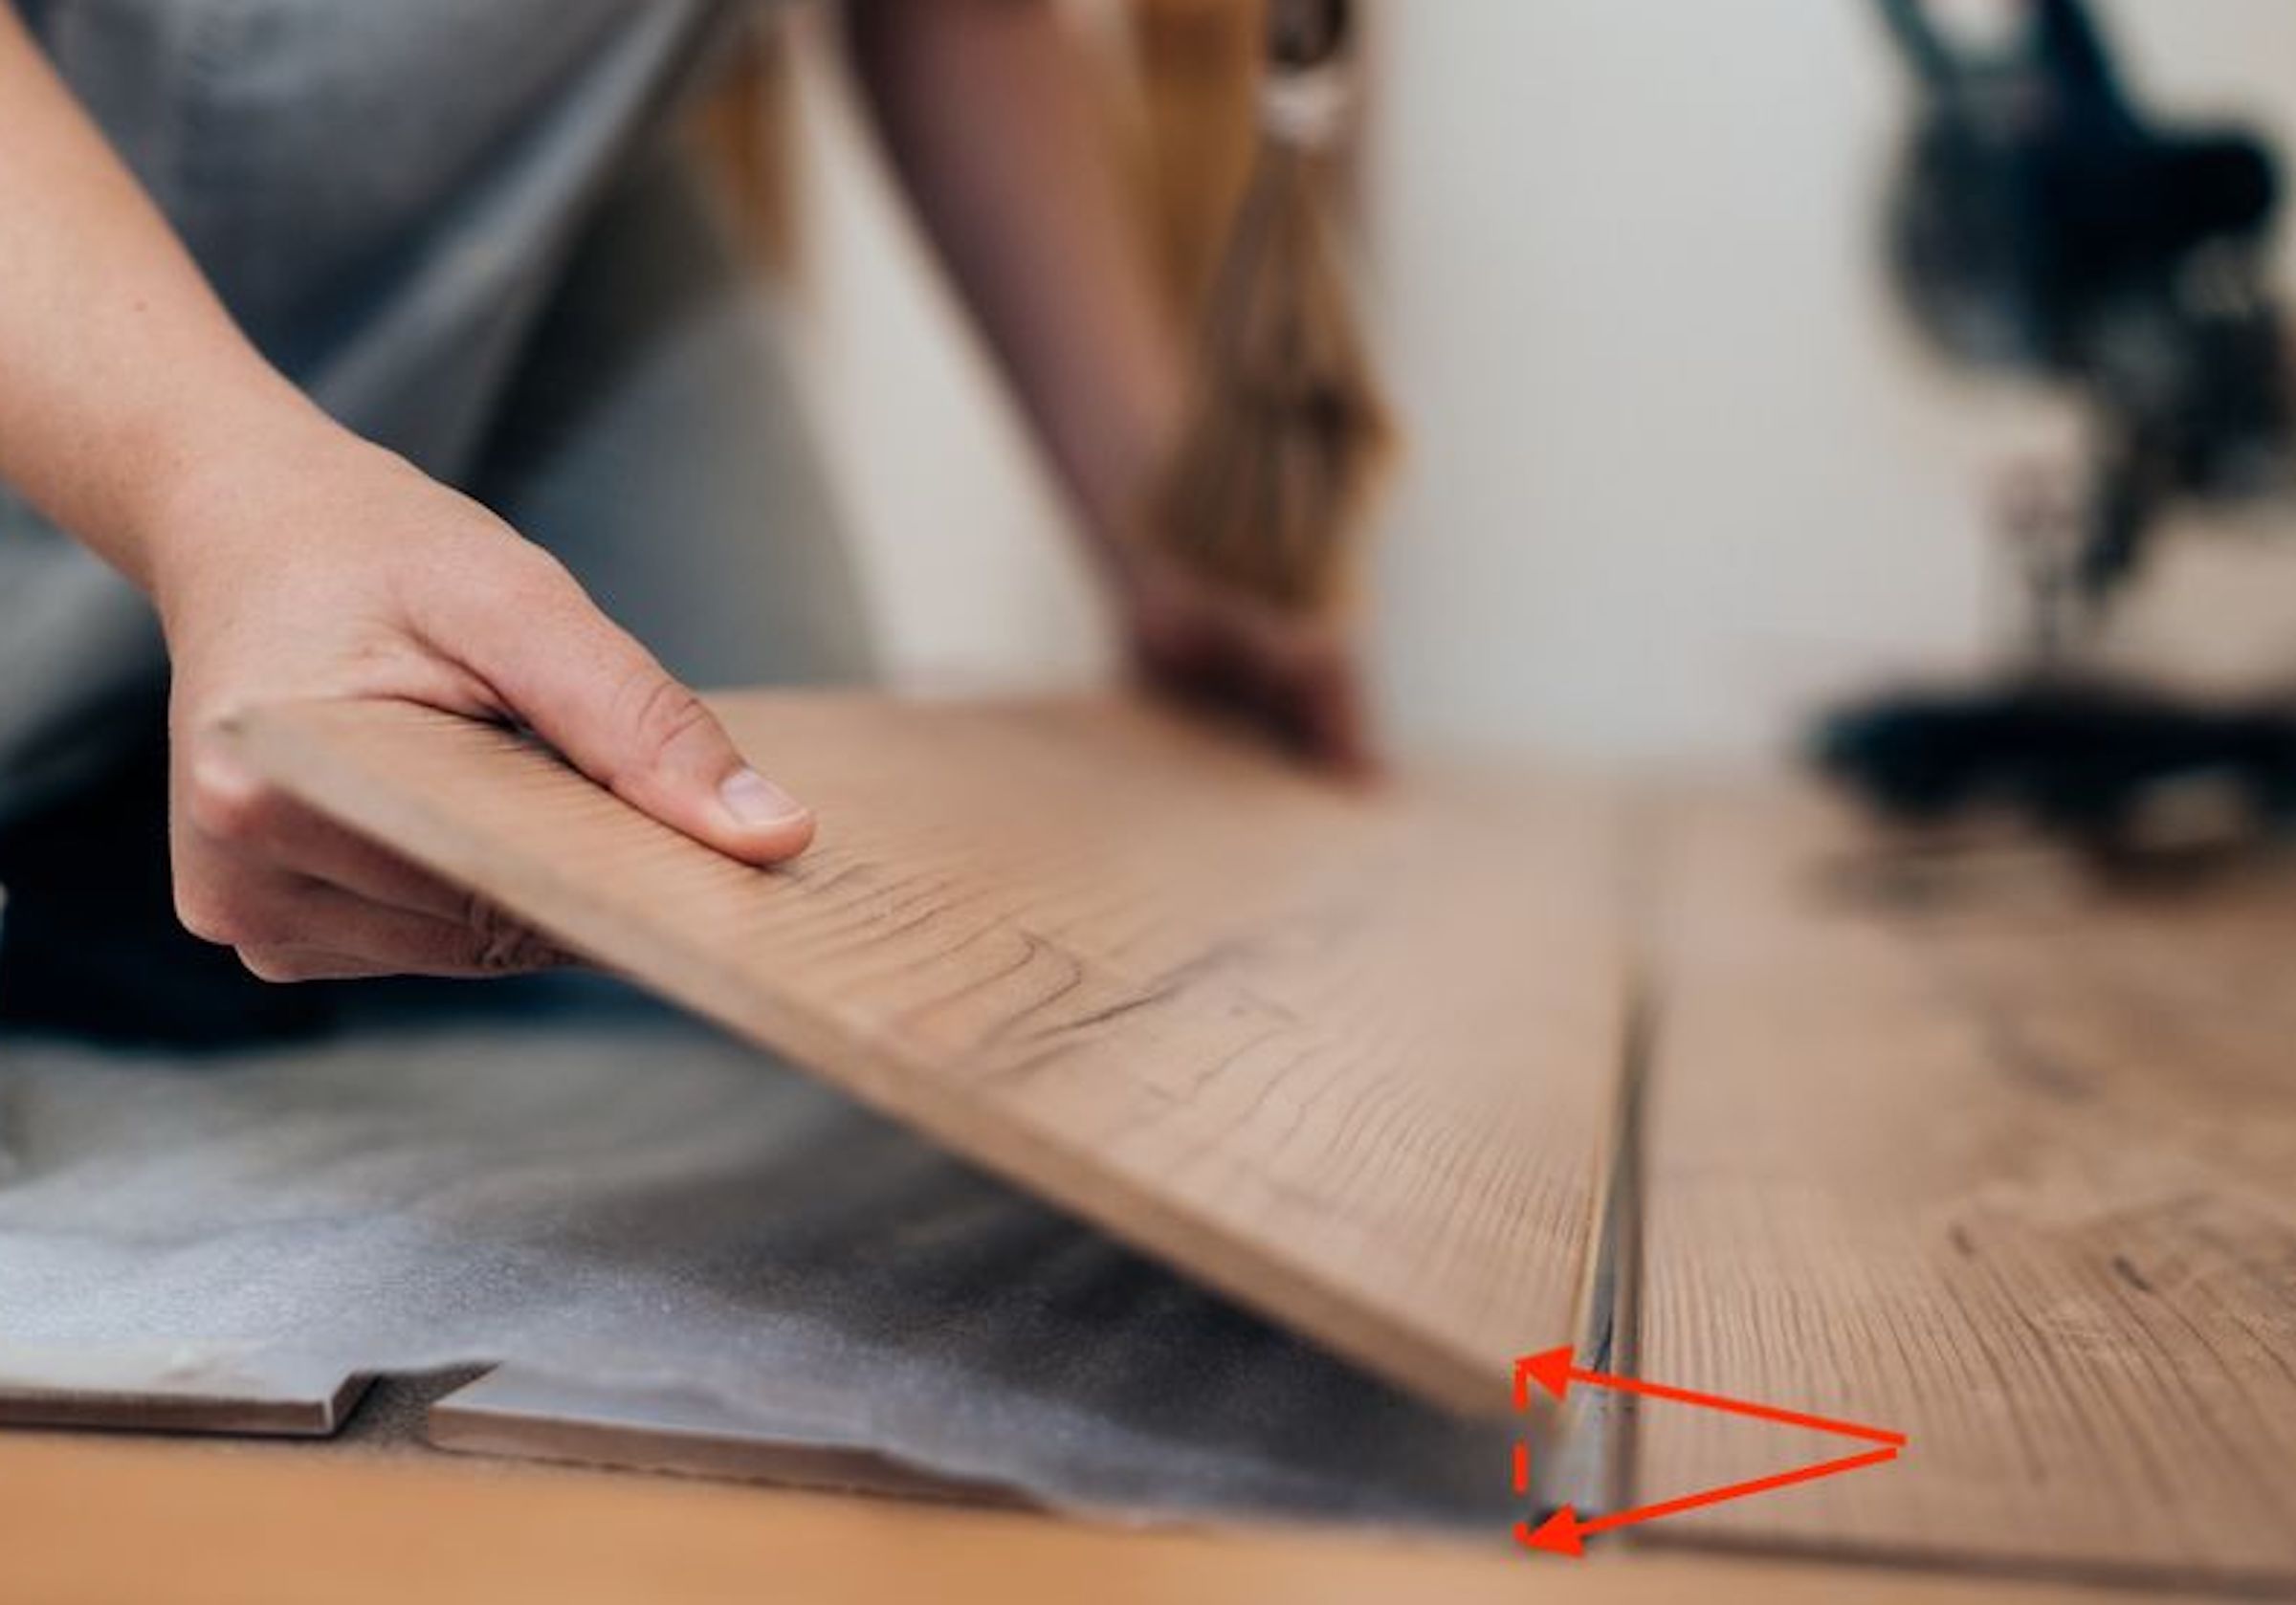
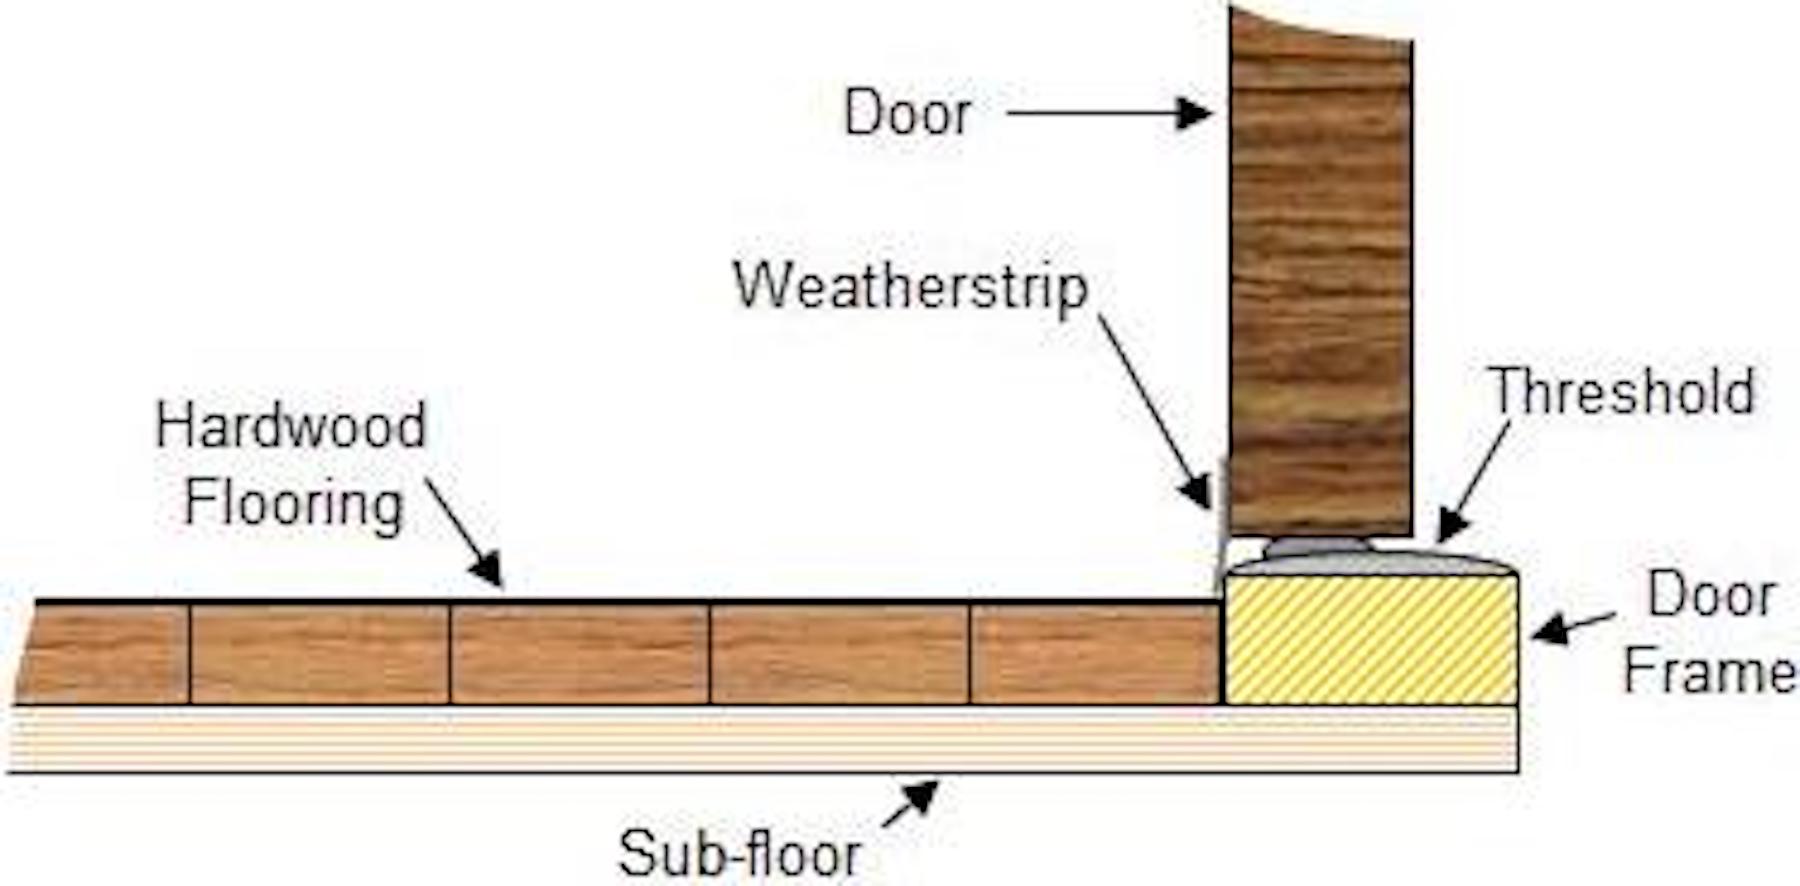
If you have a threshold on top of your flooring, add that height. Also, add the height of the space between the surface of your flooring (or threshold) and the bottom of the door. Then, add the height of the actual door, plus at least 1” for the door jamb (many carpenters add 2”). The jamb doesn’t directly fasten to the framing, so the extra inch gives you wiggle room for miscalculations.
Once you have added together all these variables, you will have the height measurement for your rough door opening.
Once I have my final height measurement, I lightly mark it on both king studs. Just in case the floor isn’t completely level, I then use a level to establish which of those two marks is higher. I take that as the working height and, using a level, make a matching mark on the other king stud.
The Jack Studs
Next, measure the length from the floor to the leveled mark on each king stud. Cut a jack stud for each side, using those measurements. Note that your jack studs might be slightly different lengths.
Jack studs only extend from the bottom plate to the top of the rough opening. Each one is nailed to a king stud, and is meant to be a support for the header.
As Don Vandervort explains it:
“The jack stud is shorter than the full-length king stud on each side of a window or door opening but critical for holding up the ends of the header that bridges the gap. The jack stud is sometimes called a trimmer stud.”
If the header is not in a load-bearing wall, it won’t be carrying the weight of the house above. In that case, in my opinion, jack studs are only necessary for reducing the amount of vibration that is transferred to the walls when a door is closed. The original framing of this house only used jack studs in load bearing walls.
If the wall is not load bearing, the header can simply be a piece of the same kind of framing stock, laid on its side. If the wall is load bearing, there are a couple of ways you can frame it. I’ll get into those in a future post, when I discuss framing the replacement windows and exterior doors. (Exterior walls are always considered to be load bearing.)
Putting in the Cripples
Either way, short lengths of stud then need to be installed above the door opening, to accommodate the drywall. They also help to carry the weight above the door (or window) opening, and offset the absence of studs directly below them.
These short lengths are known by the unfortunate term “cripple studs”, or simply “cripples”. (According to Don Vandervort, “The term “cripple” probably originated from the Old English crypel, meaning a person disabled from lack of use of a limb. Its adoption as a building term first appeared in the mid 17th century as a reference to a temporary staging area for cleaning or painting windows.”)
Even though there has been some effort to come up with a less offensive name, none has stuck industry-wide.
Most often, cripples are spaced 16” On Center (OC) from the wall’s framing, as though the door opening weren’t even there. (For more explanation about what “on center” means, take a look at my earlier post “Making Camp”.)
Doing it this way allows you to later install drywall in full sheets, and then cut out the rough opening.
Some builders center a single cripple over the door opening and insist that the sheets of drywall start centered at that point. Others have their sheets completely span the opening, claiming that this reduces the likelihood of cracks forming in the plaster of the corners.
Since this kind of crack actually results from a house settling—and if a house were to settle, it does so from the foundation on up to the roof—I doubt a couple sheets of drywall can carry that load and not crack.
Final Step to Moving a Door in an Existing Wall
On the edges of the jack studs facing the opening, where the door will eventually be installed, cut the bottom plate flush with the jack studs and remove the cutoff. Now you have a new doorway. (I actually did it earlier in the process, but if you are new to this, doing it last will be your best chance of not making a mistake.)
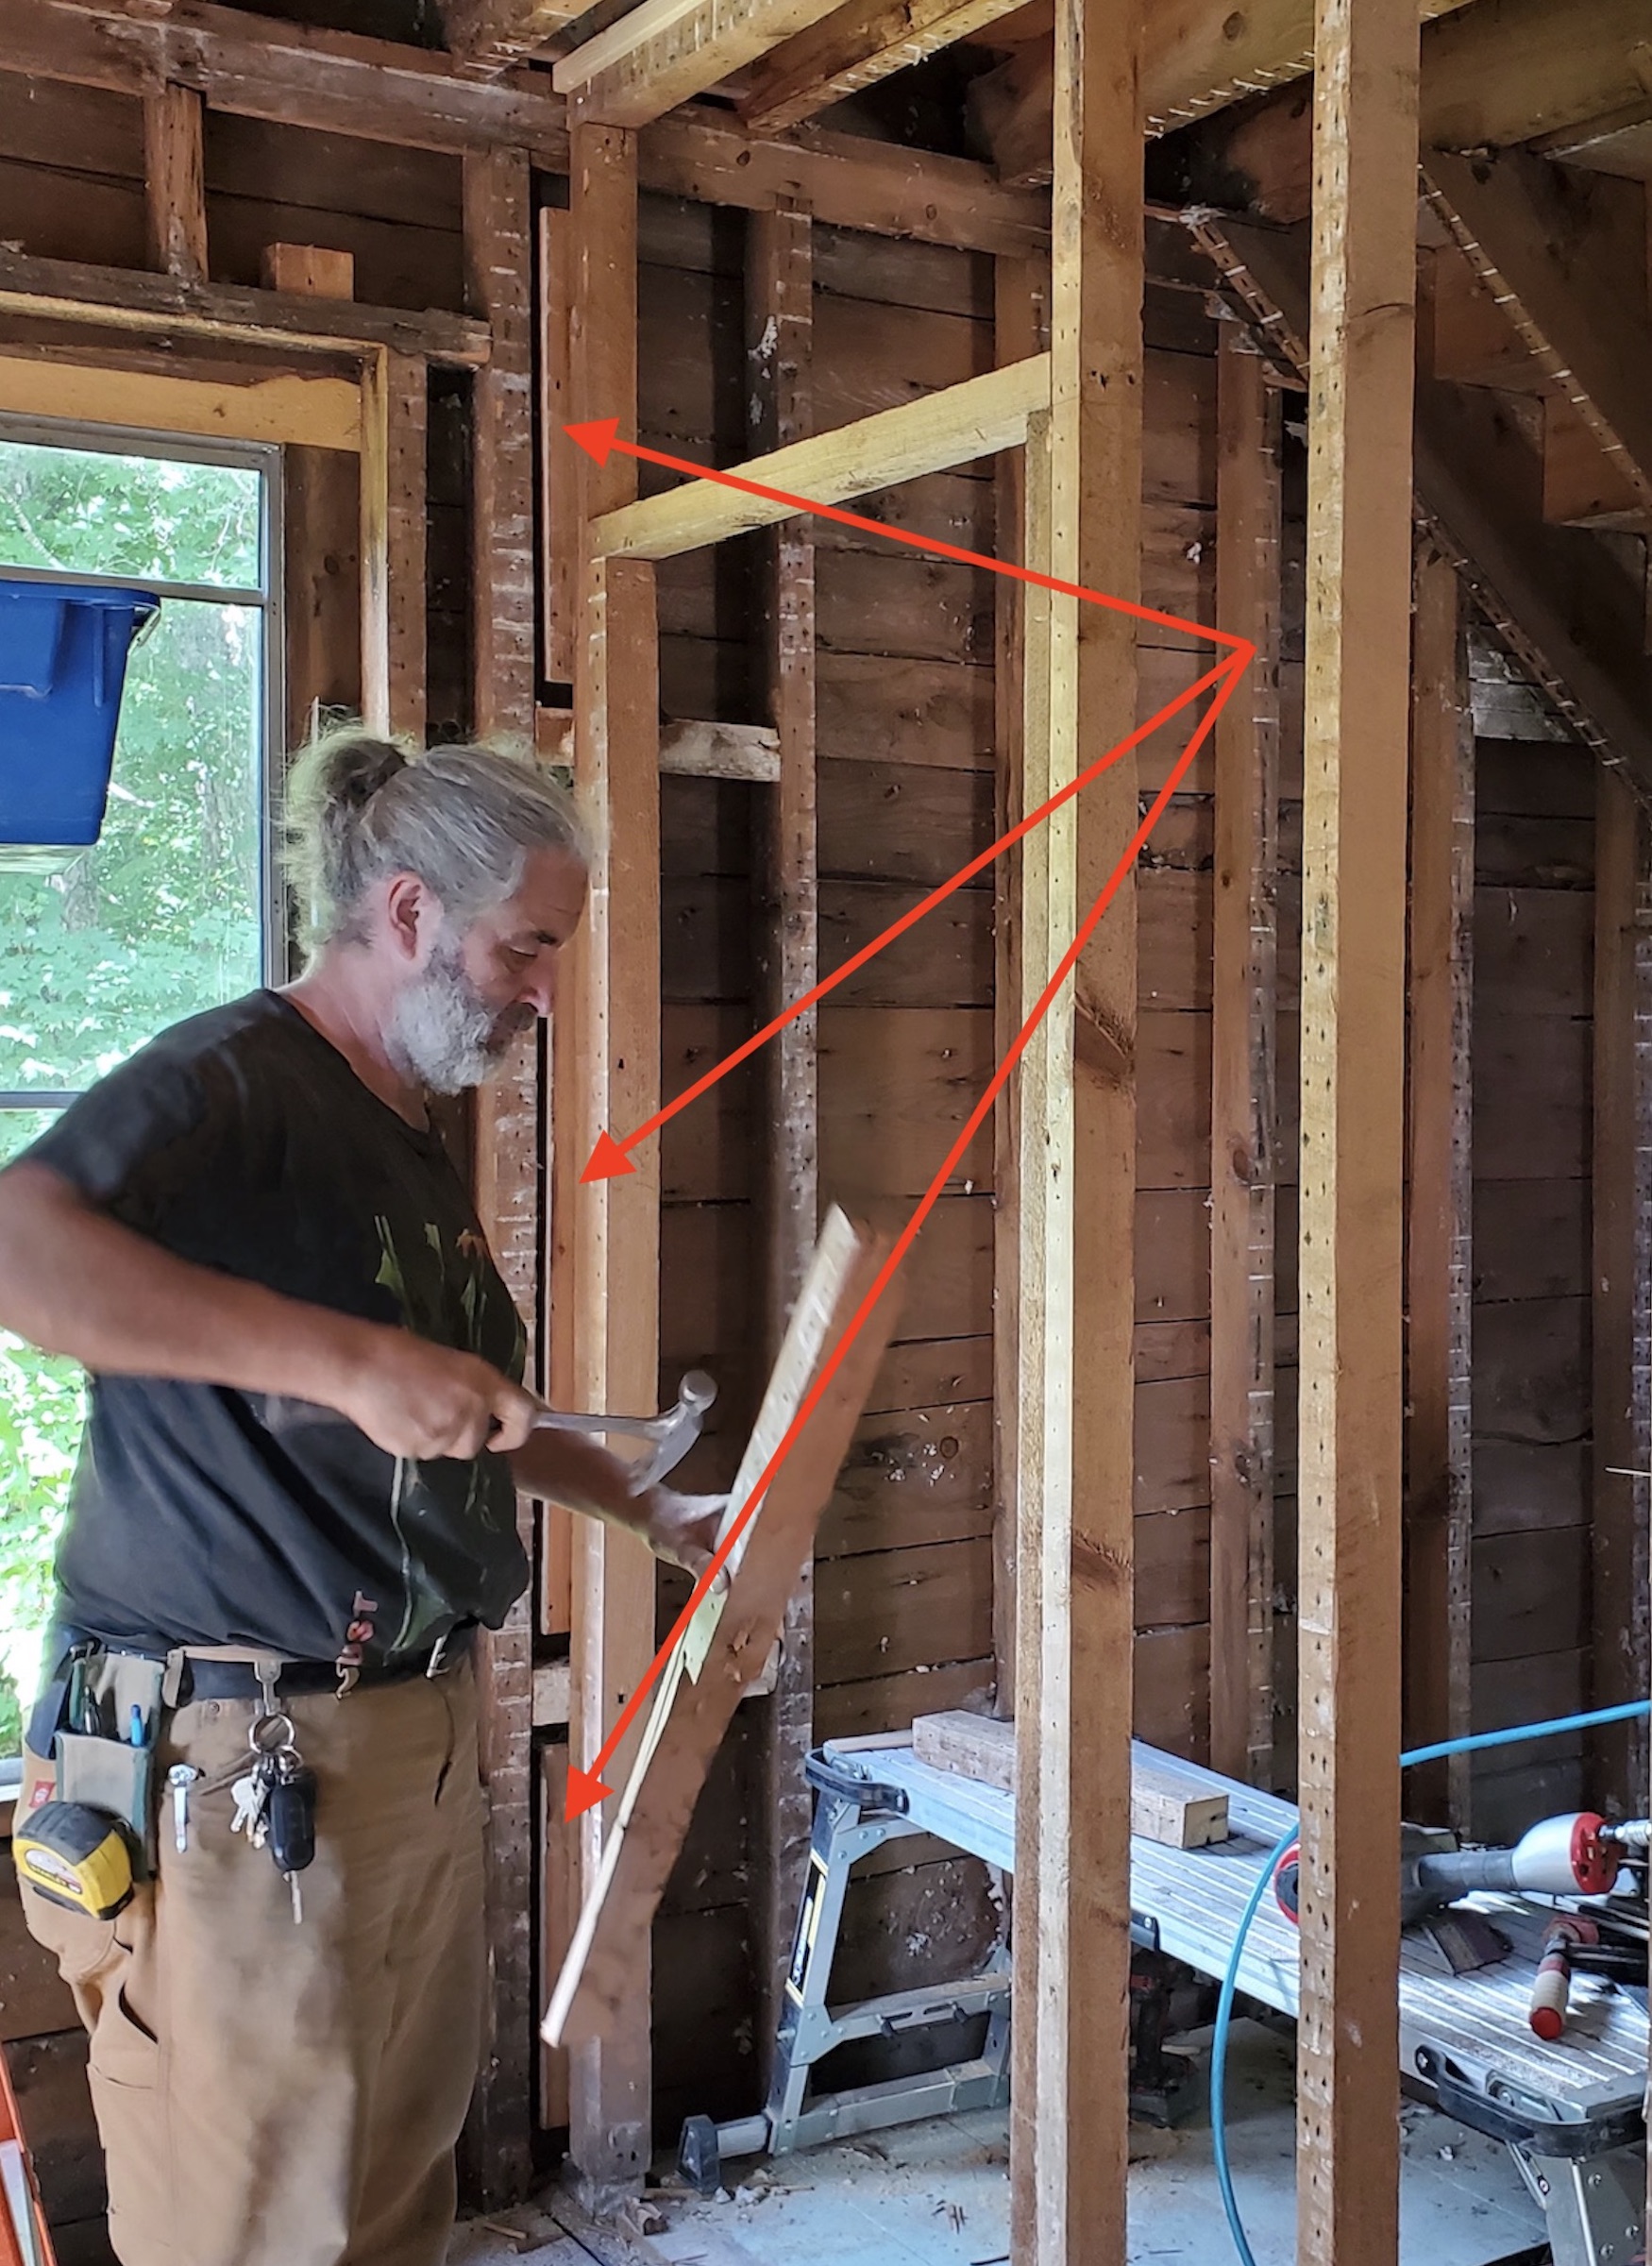
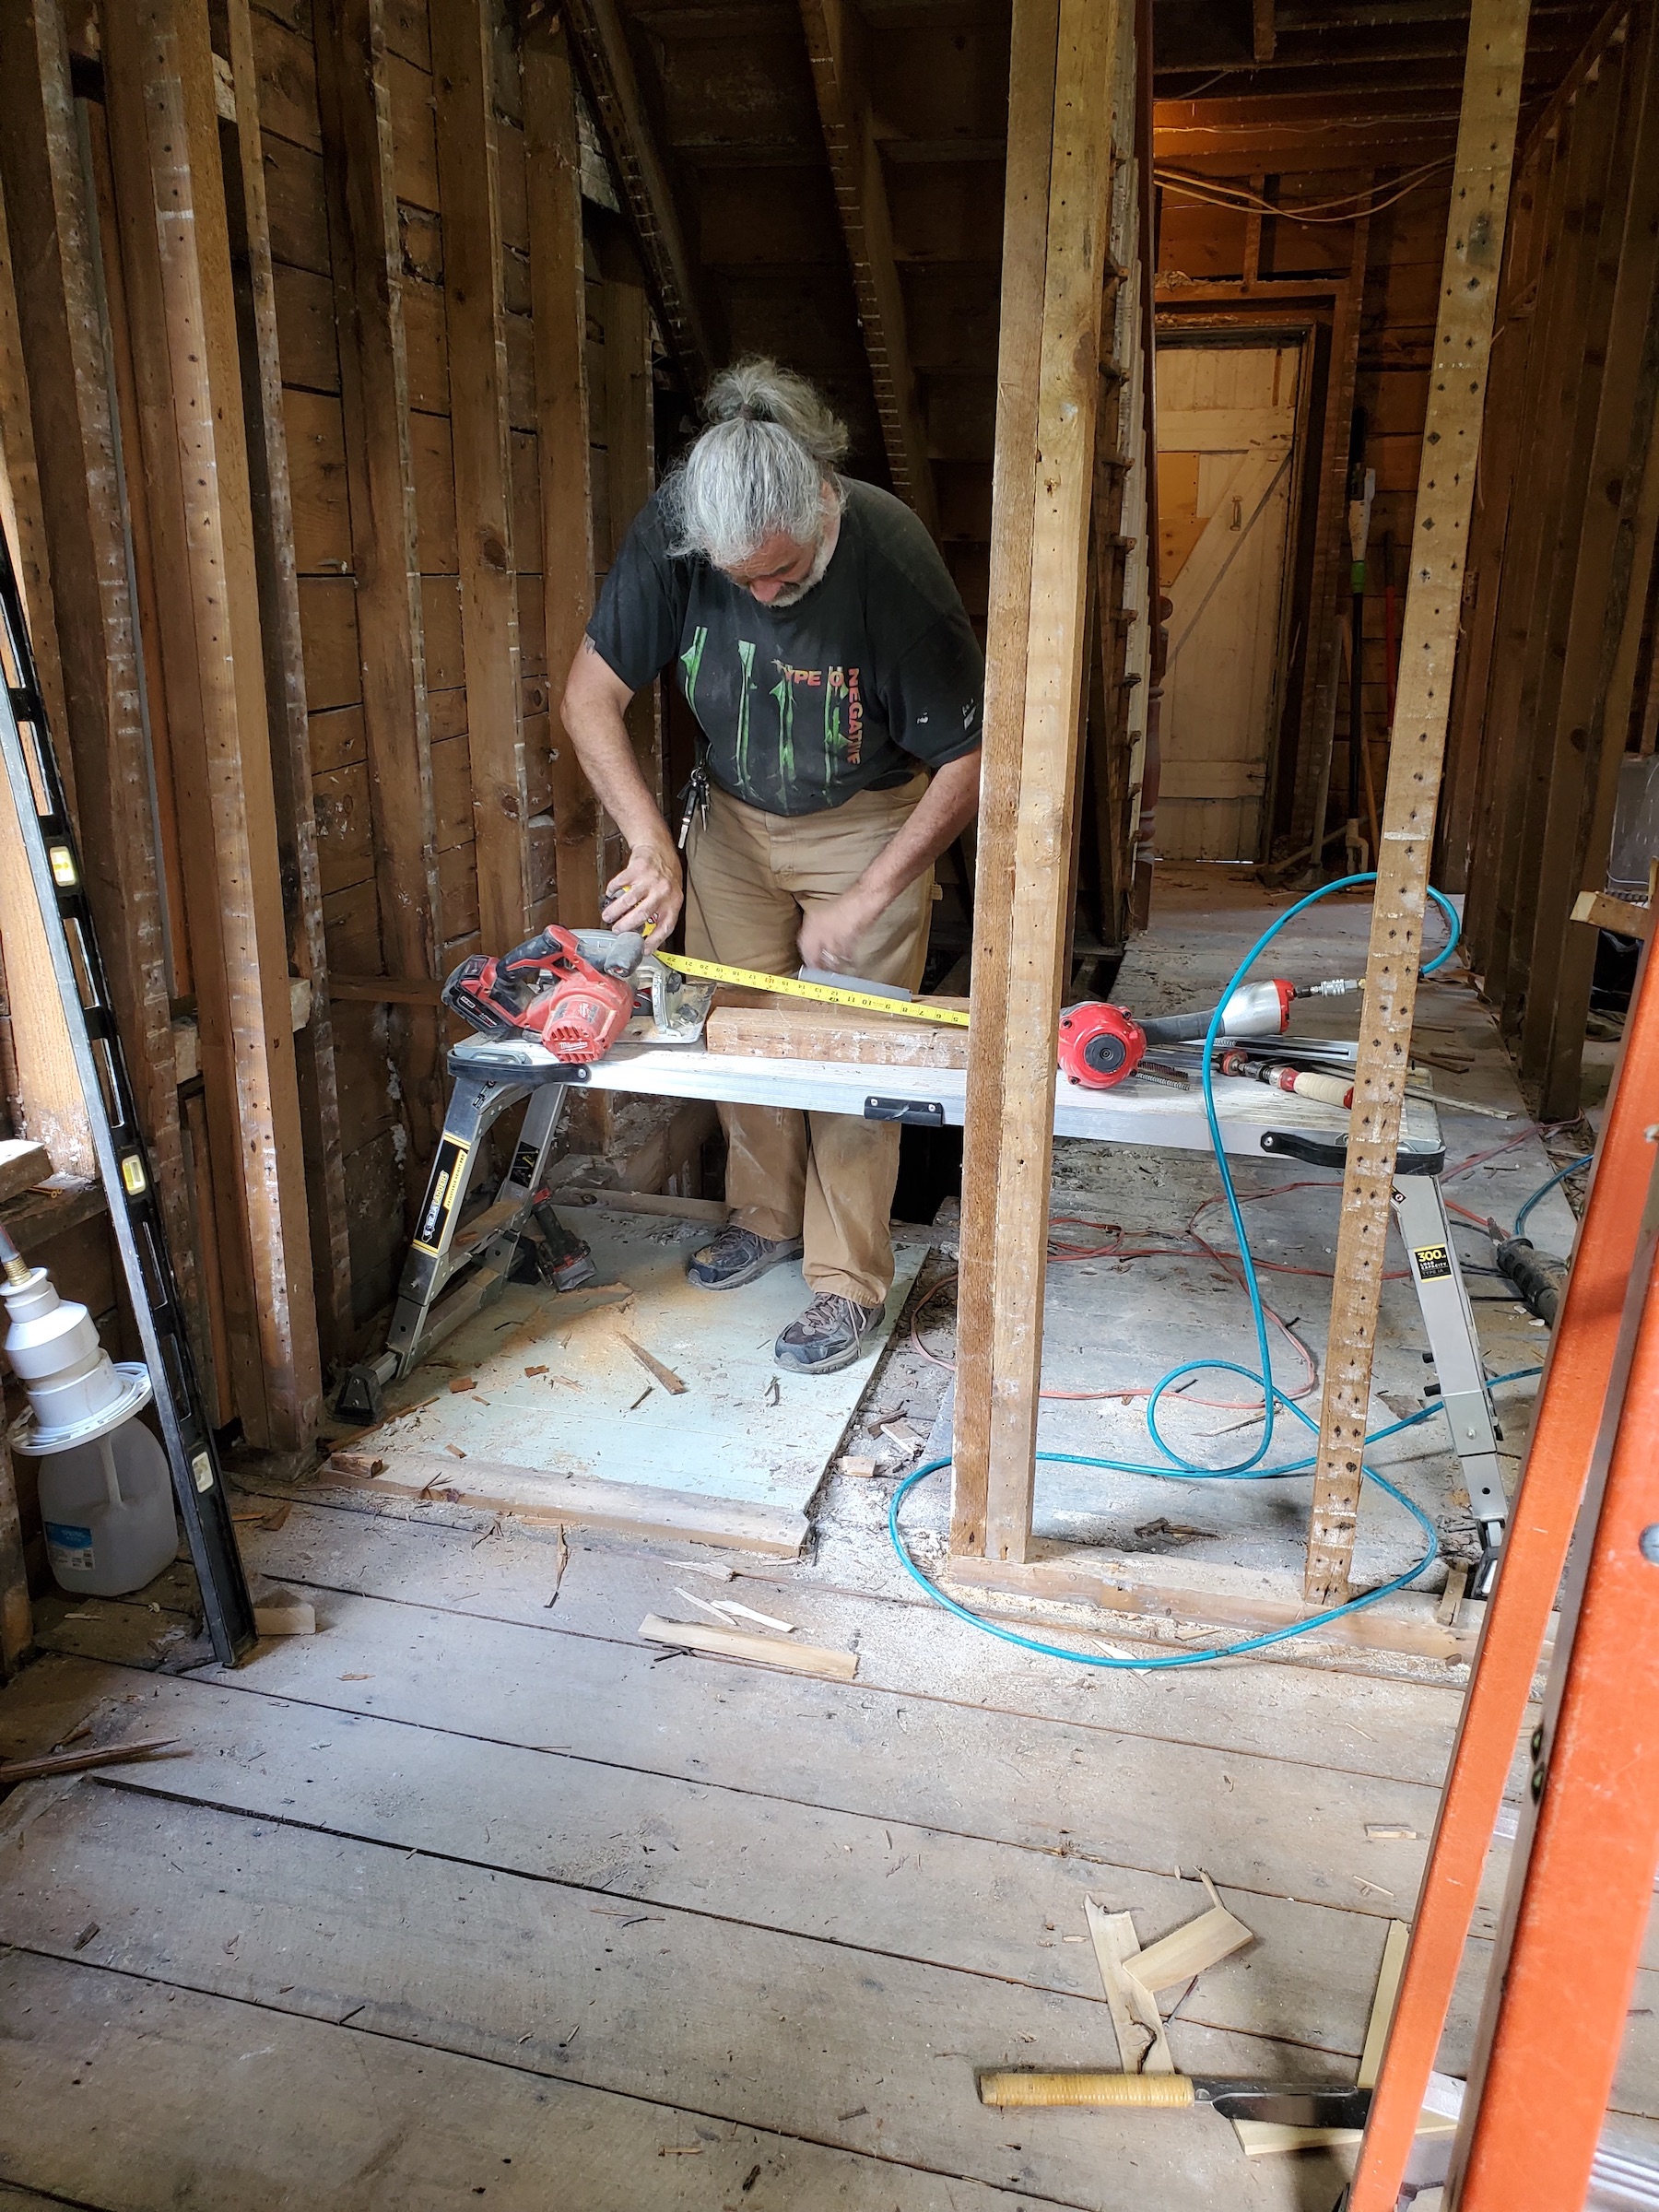
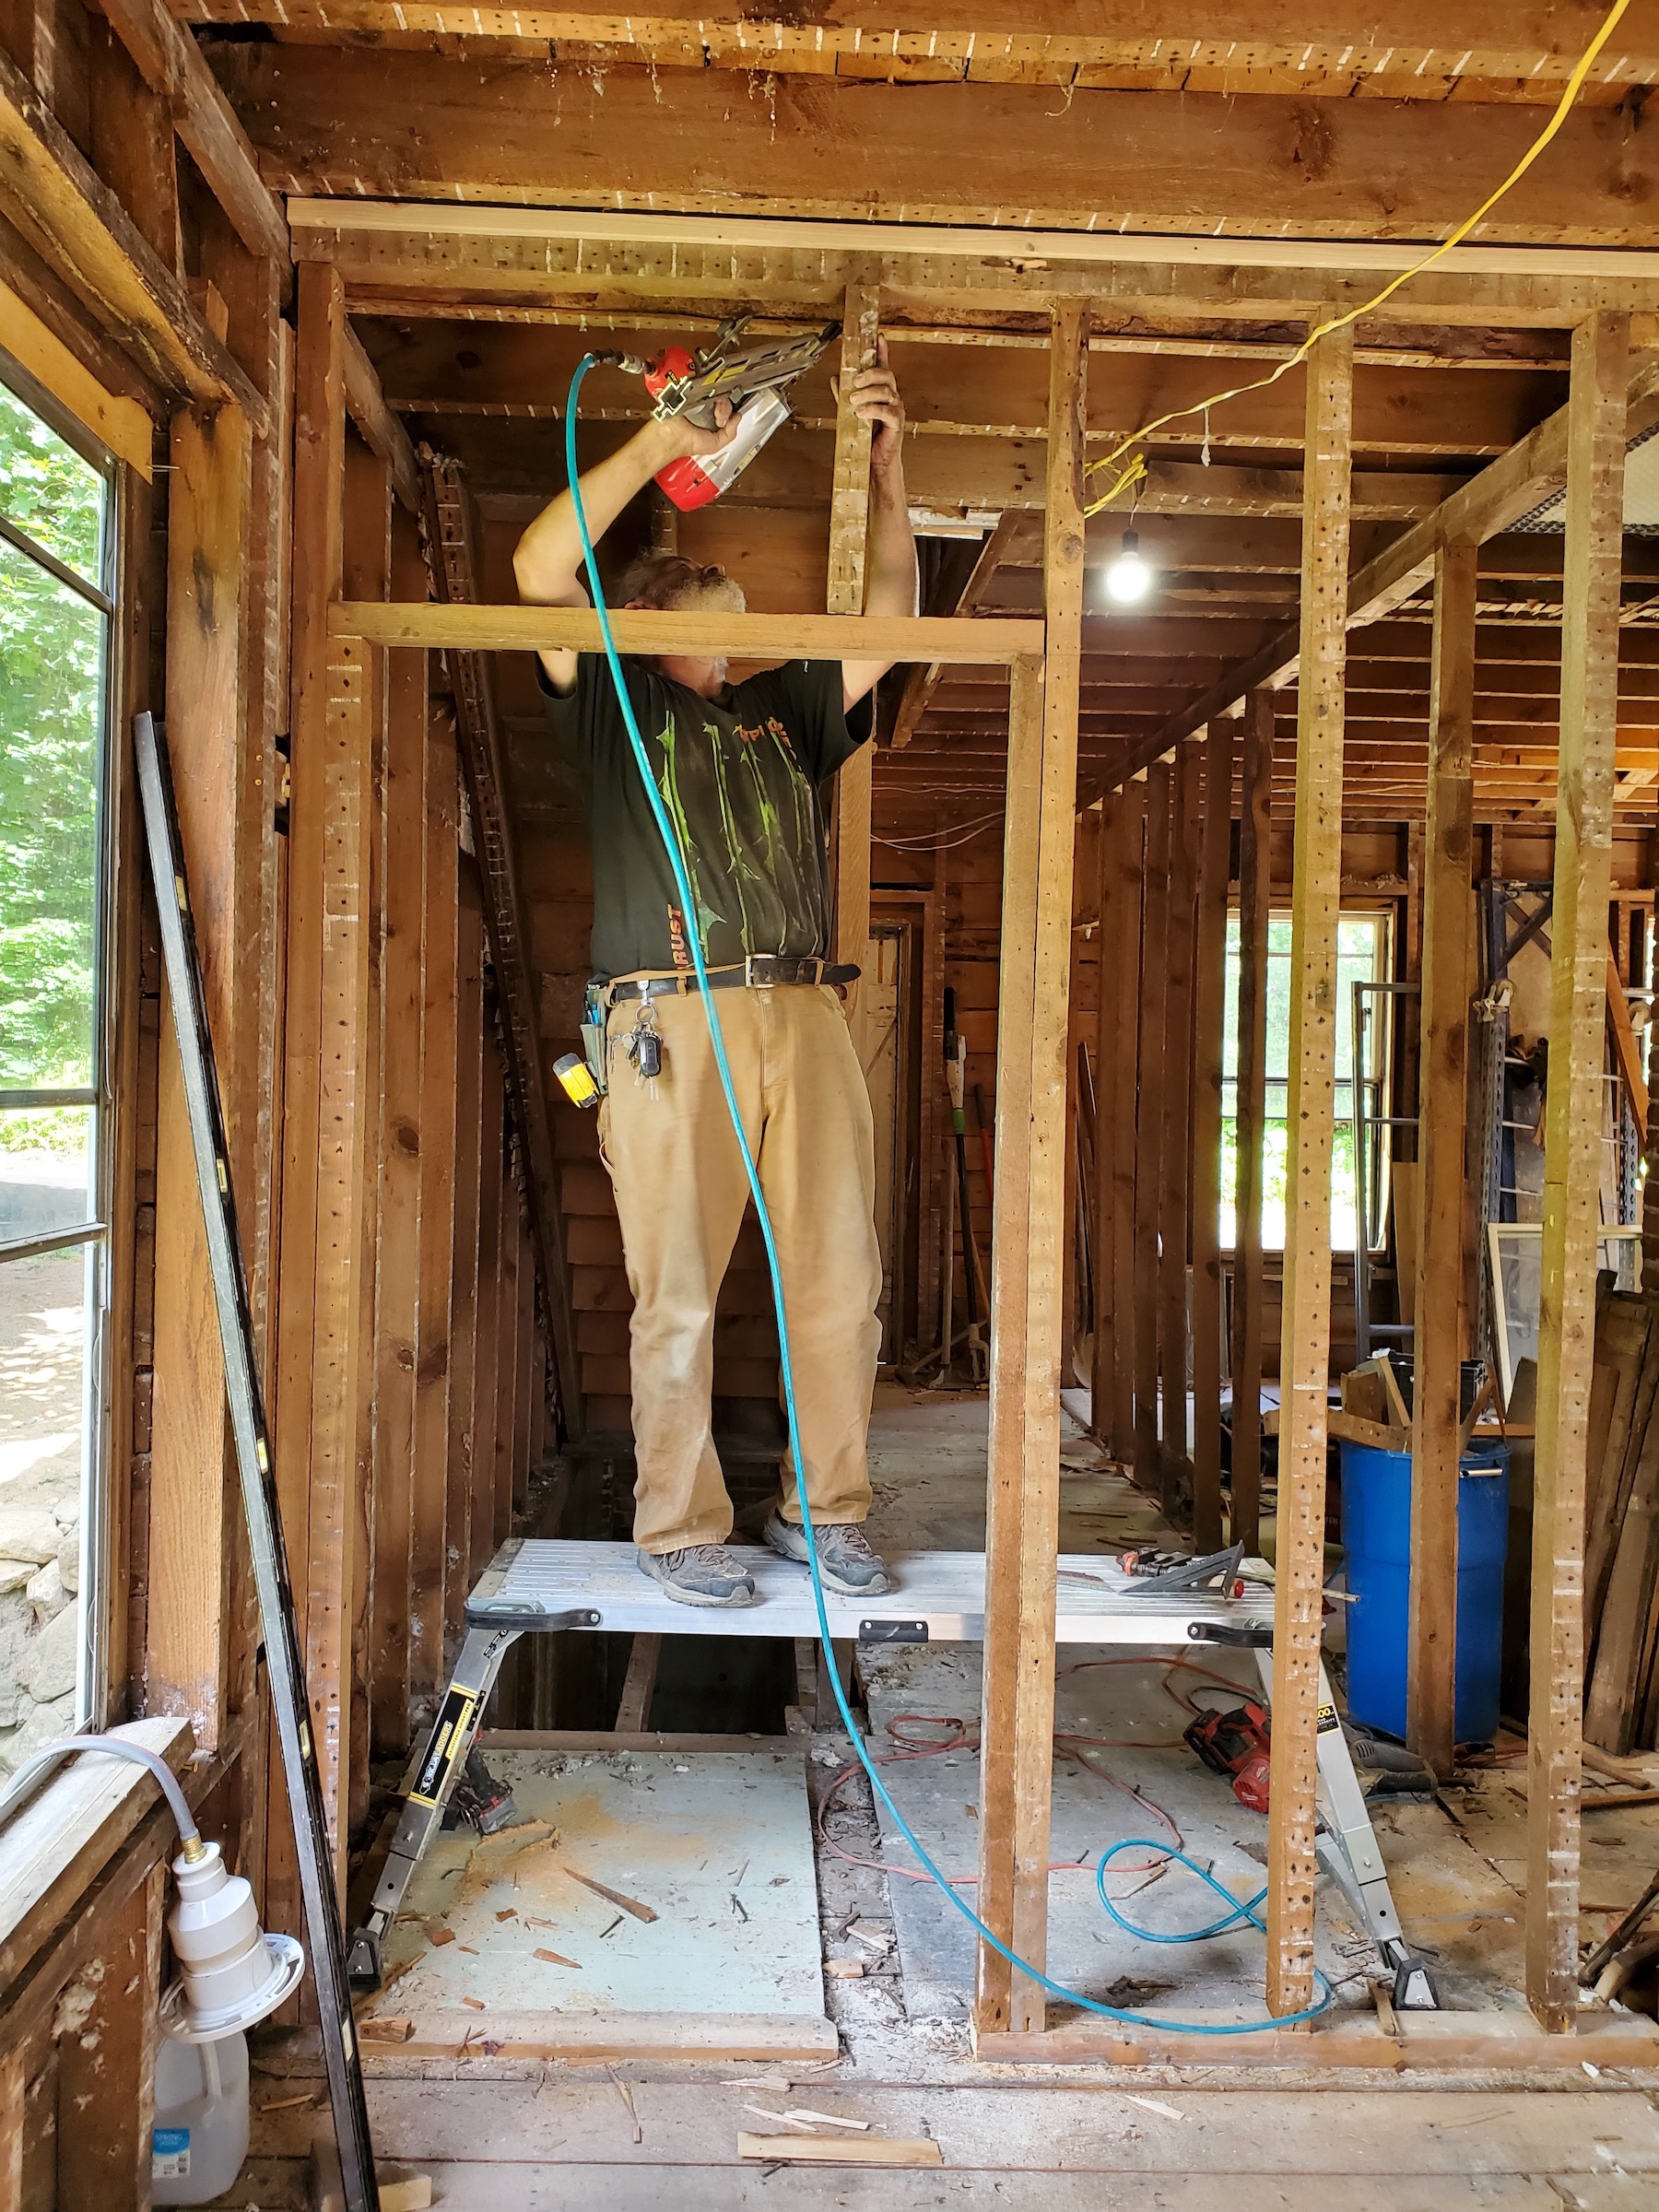
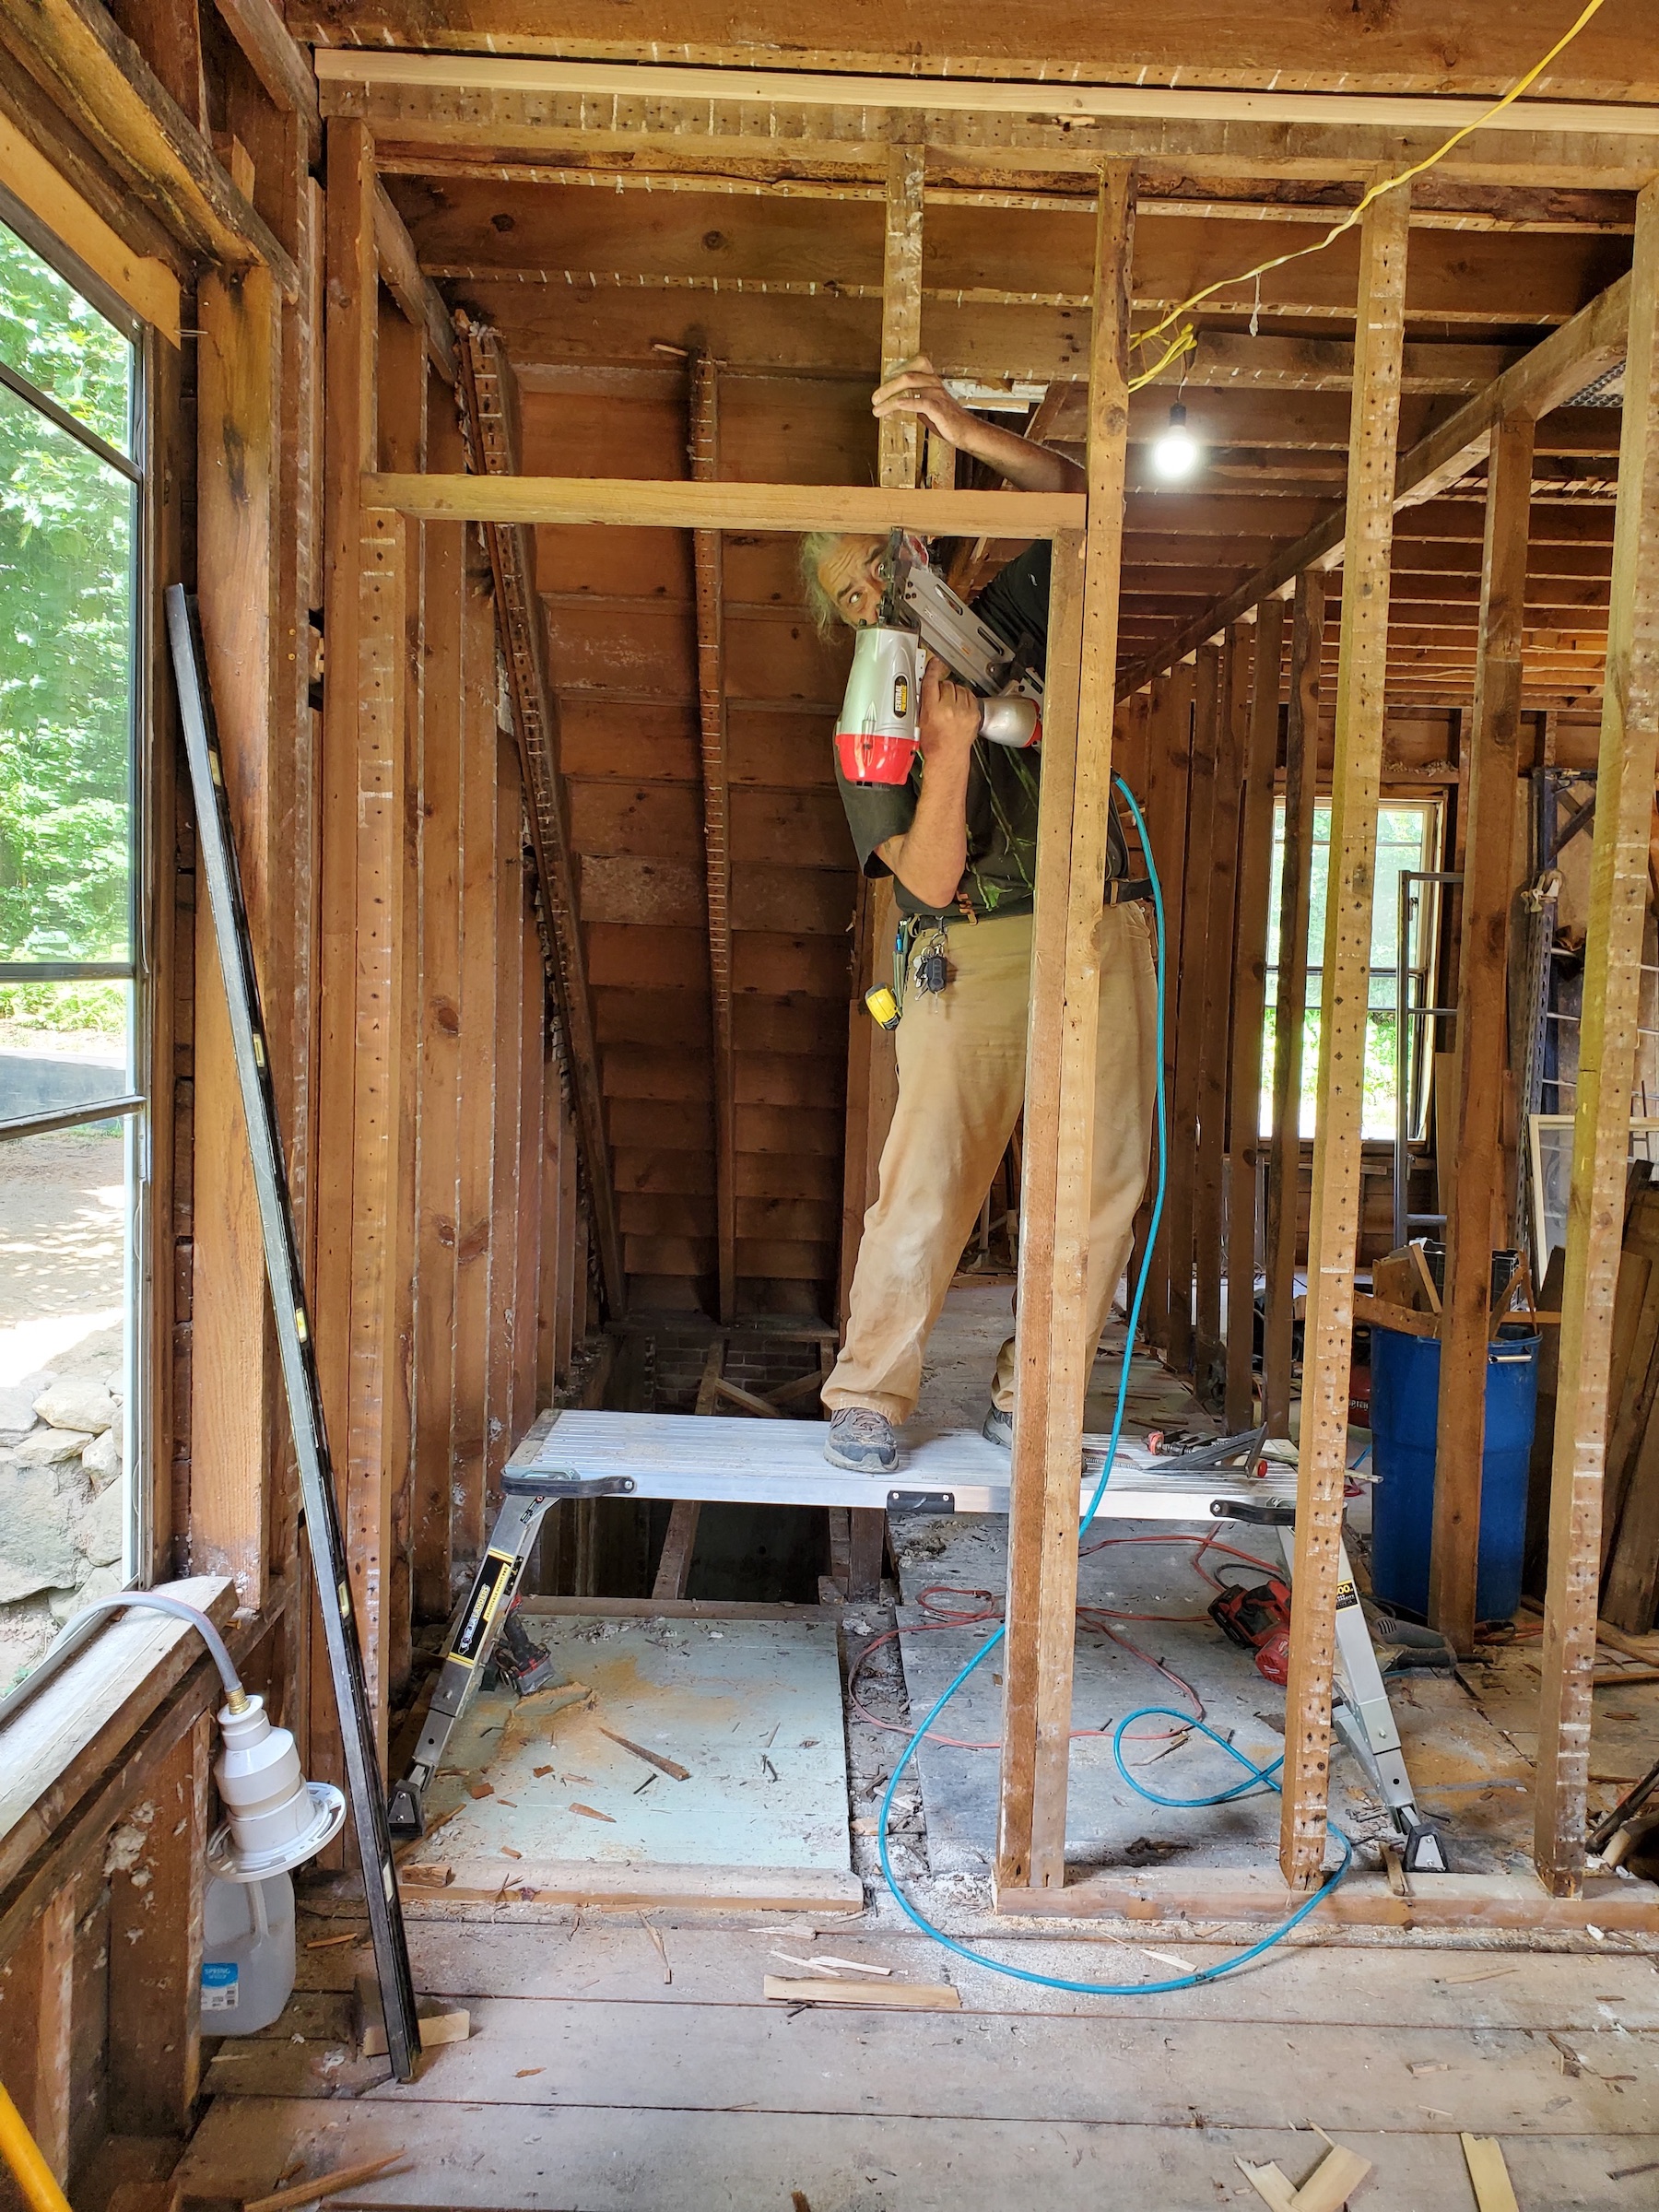
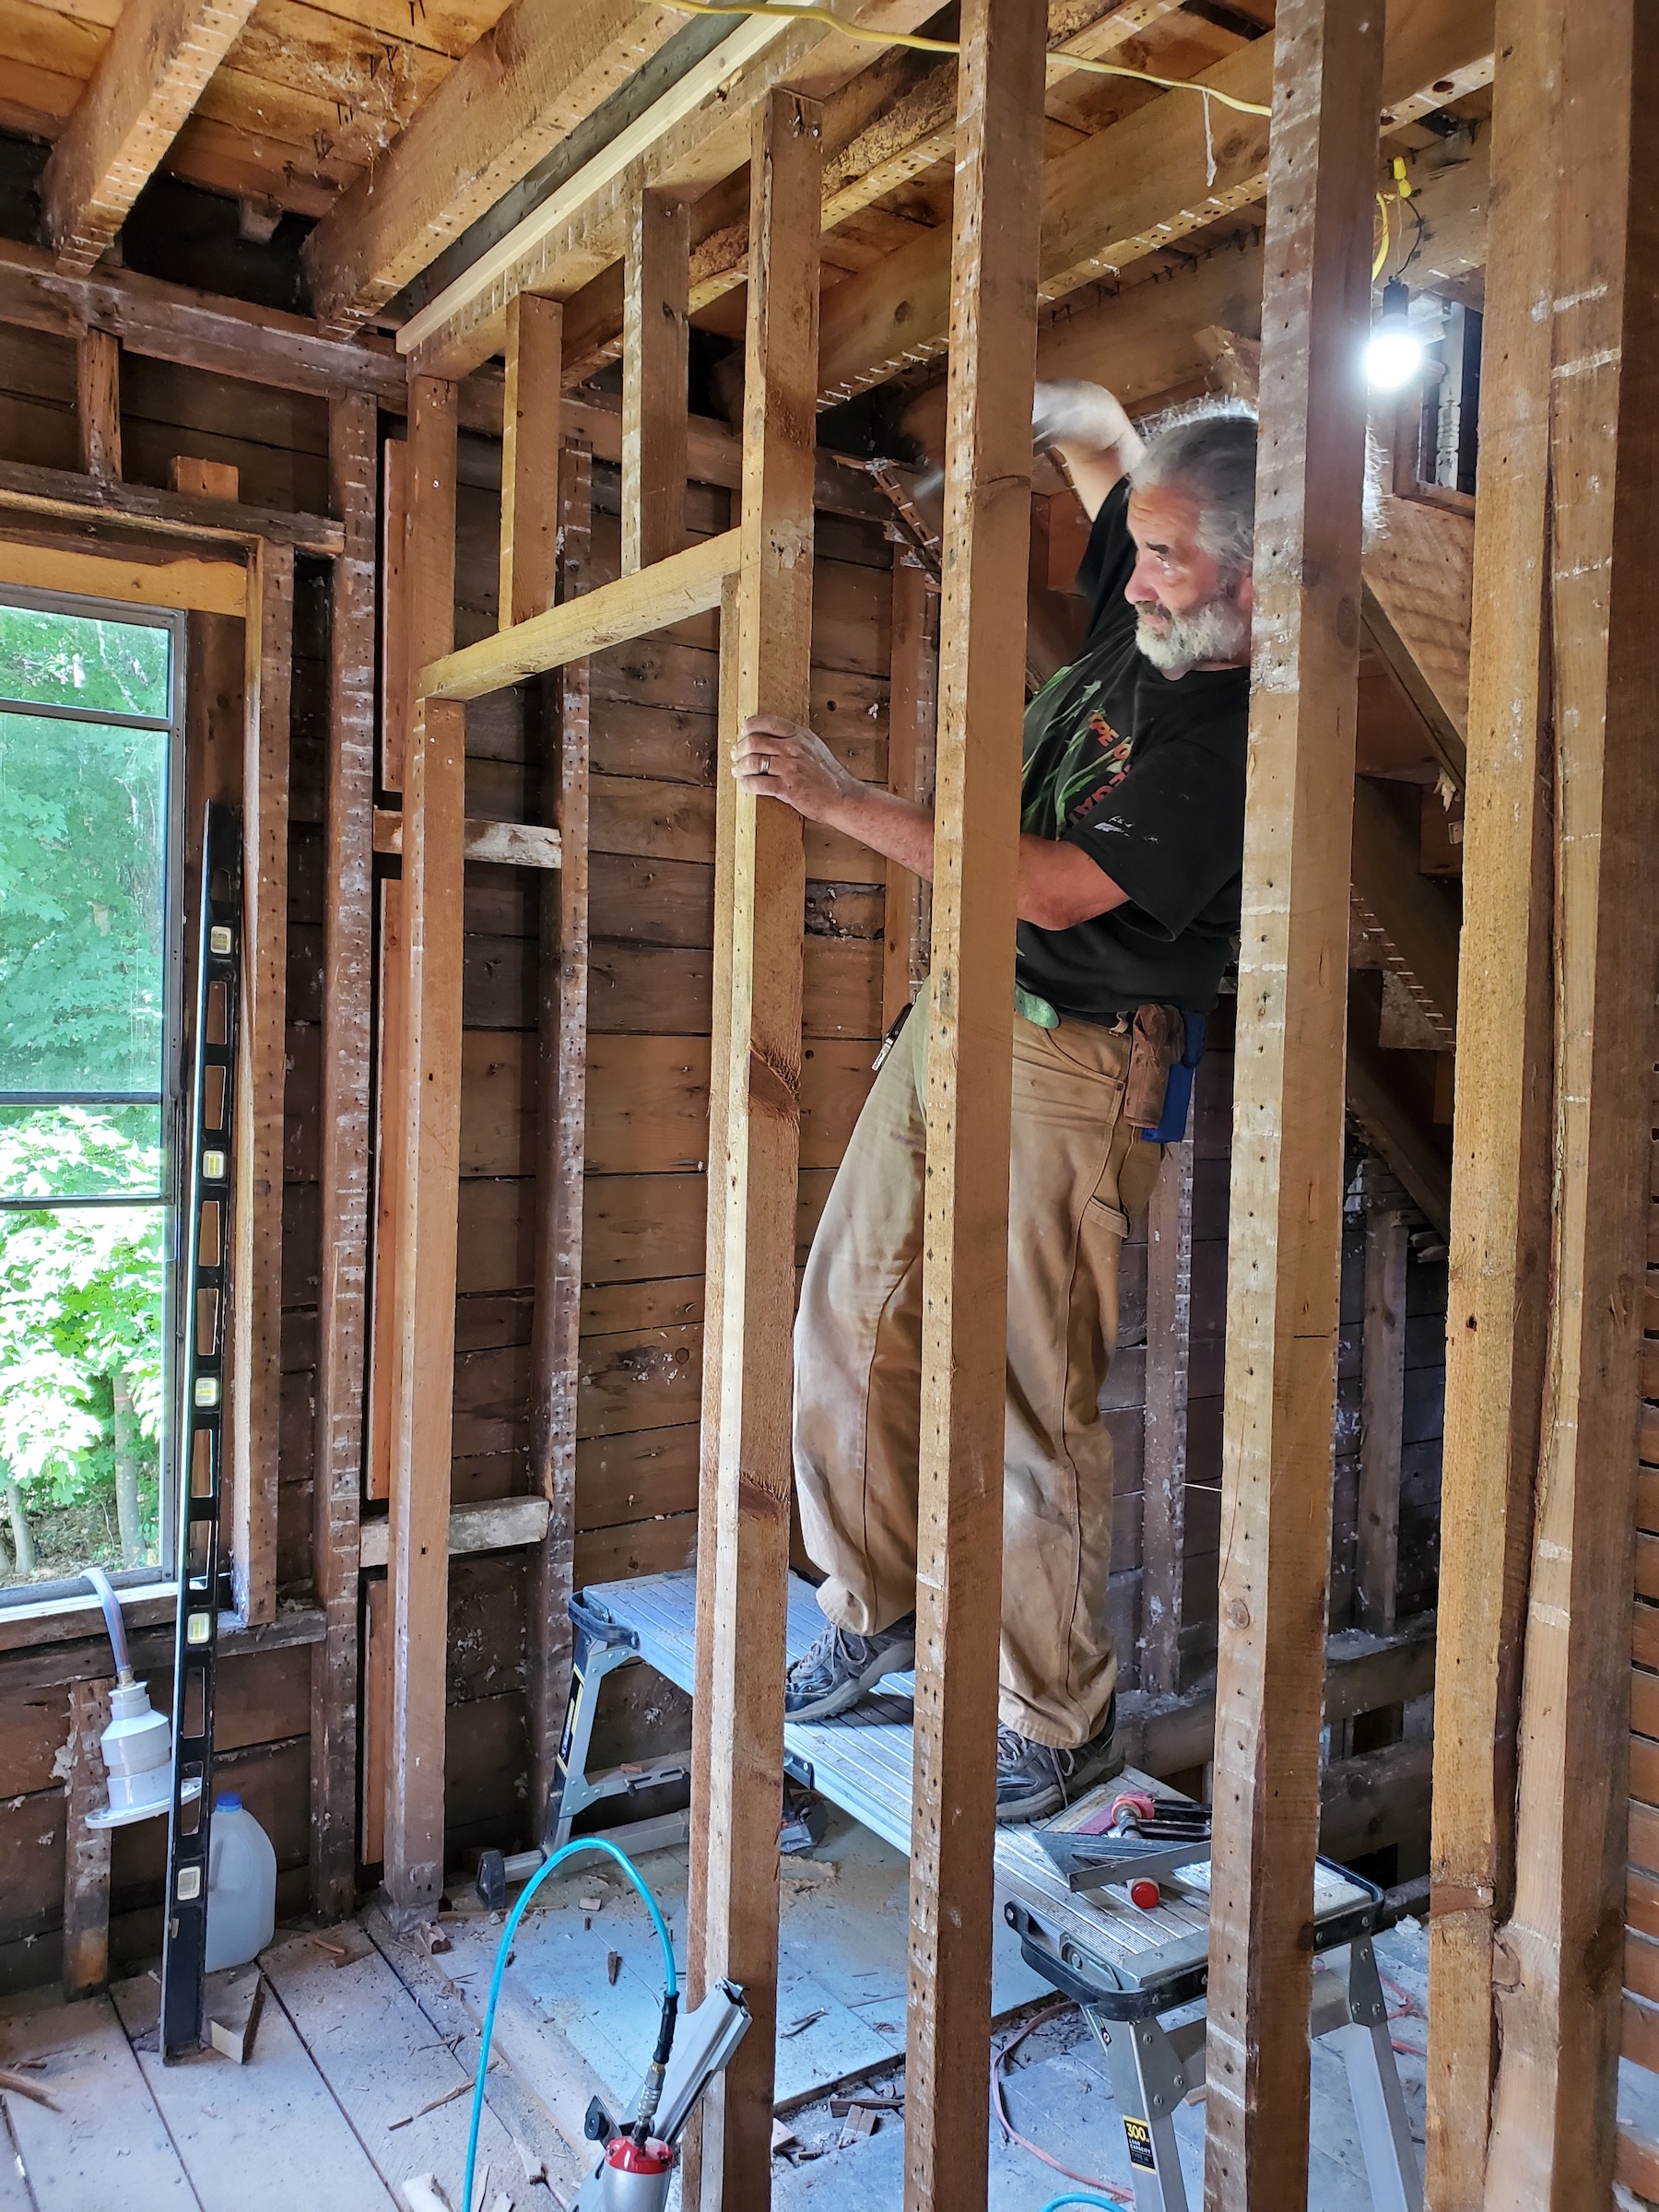
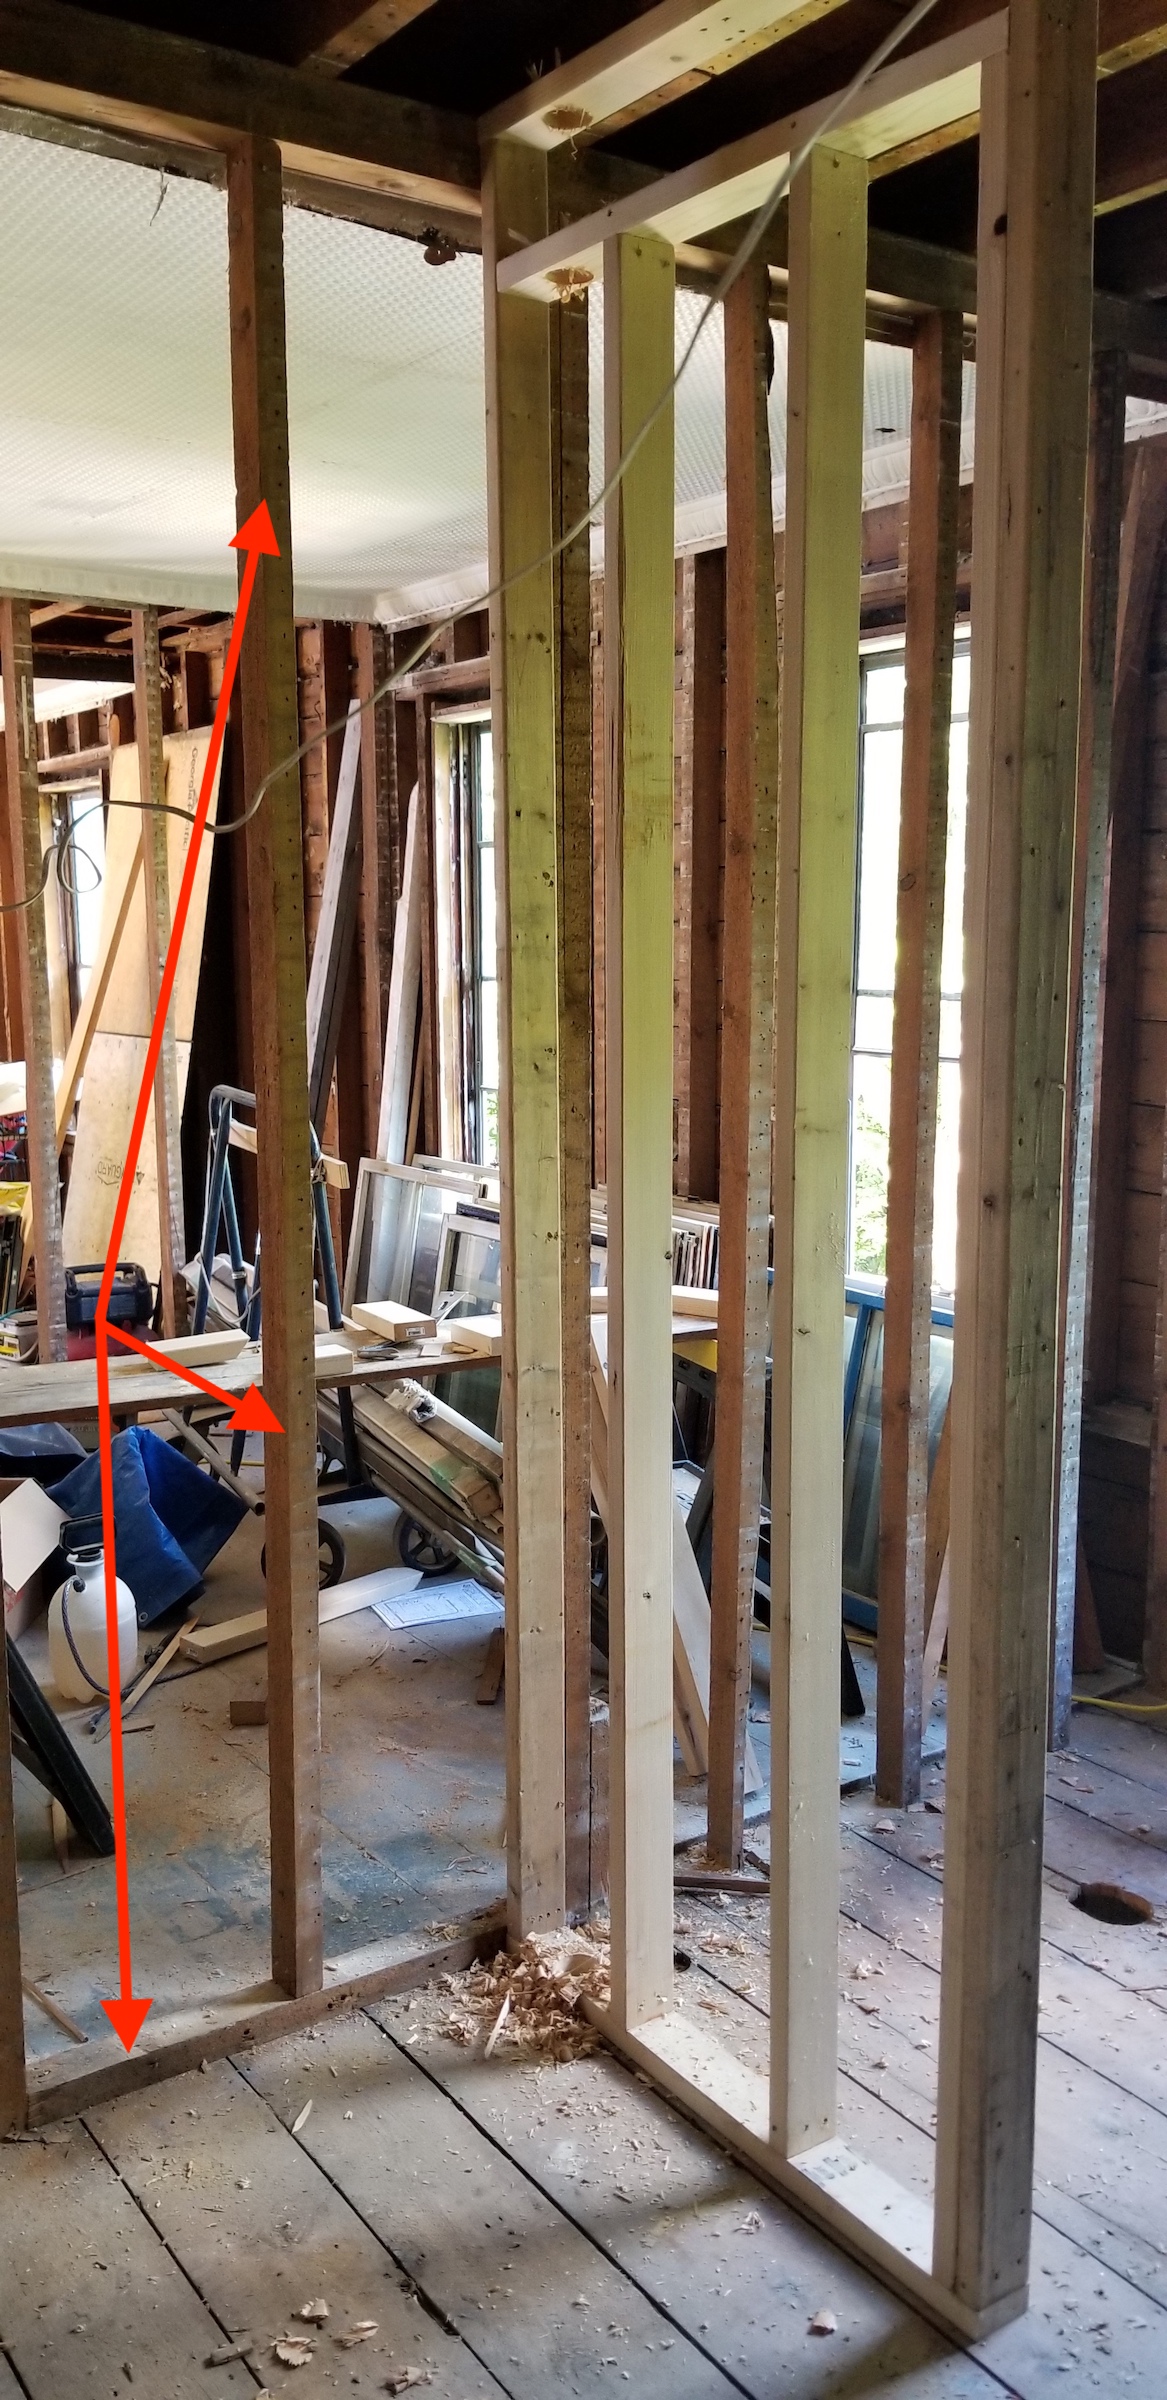
In the pictures that follow, you will see what Linda refers to as the “Dance of 1000 Nails” as I twist and contort to shoot nails where I need them. Although it is true that it helps to be part contortionist for this part, it actually requires a little under 100 nails. However, she is right that “1000” sounds better than “100.”
Closing Up a Door
Now that you have sat through my description of framing a door, closing an old one is simple.
First, you nail a piece of framing stock across the floor where the bottom plate had once been cut away for the door opening. Also nail it into the existing bottom plate.
Finally, add a stud or two inside the door opening. Some people install them 16” OC to make them uniform to the wall, but in reality, one down the center is all you need, as long as the opening is no more than 48”.
If there is already plaster in place, you will probably have to add some boards to the jack studs and header. These can be a nominal 1” (¾”) thick or you can use your framing stock. You just need enough surface to firmly attach the drywall later on.
Even if the wall is load bearing, the original wall was meant to carry the weight of the house with what amounts to a hole in it to begin with, so you really only need enough framing to hold the drywall you will eventually apply to close up the hole.
OK, Queen Stud, I’m done with the entry now….
RESOURCE LINKS
* The image used to illustrate the rough framing of a door has no known citation. All the links associated with it appear to have been hijacked by spam sites. If and when we locate a legitimate citation, we will provide it.
For a review of how to frame a door, check out Scott Grice. 2009. “Frame a Door Rough Opening: A pro carpenter teaches you his 3 simple rules for framing door rough openings efficiently” in Fine Homebuilding, issue 201: https://www.finehomebuilding.com/project-guides/framing/frame-a-door-rough-opening.
For more on the measurements of boards (or “dimensional lumber”), check out “Nominal vs. Actual Lumber Dimensions: Why a 2 x 4 Does Not Measure 2 Inches by 4 Inches: https://www.thesprucecrafts.com/why-isnt-a-2×4-a-2×4-3970461
If you want to see how a tree is milled into lumber, take a look at “How lumber is made in Sawmill Factory – Huge Douglas Fir Logs to Lumber”: https://www.youtube.com/watch?v=luqBz0ZTDgs
For framing a door near a wall, see Scott Gibson. 2020. “How to Frame a Partition Wall” in This Old House: https://www.thisoldhouse.com/walls/21016821/how-to-frame-a-partition-wall
Measuring out bottom plate: HayDar. 2020. How to Frame a Door & Window Opening: https://finishingabasement.com/how-to-frame-a-door-window/
DeBoer, Scott. 2019. What Is Underlayment? https://www.mpglobalproducts.com/blog/what-is-underlayment/
To see an example of underlayment with flooring, see Truini, Joseph. 2019. “8 Steps for Installing Laminate Flooring”: https://www.popularmechanics.com/home/interior-projects/how-to/a9384/8-tips-for-laying-a-plastic-laminate-floor-15903907/
Vandervort, Don. 2020. What is a Jack Stud? https://www.hometips.com/how-it-works/jack-studs.html
Vandervort, Don. 2020. What is a Cripple Stud? https://www.hometips.com/how-it-works/walls-cripple-stud.html