Where We Started Out
Prentice Hammond, his wife Deb, and his brother, had done a thorough job of prepping the house for renovation. Some electrical wiring remained, so that meant we would have power. But the house was also fully gutted, with no plumbing, heating or cooling, or insulation.
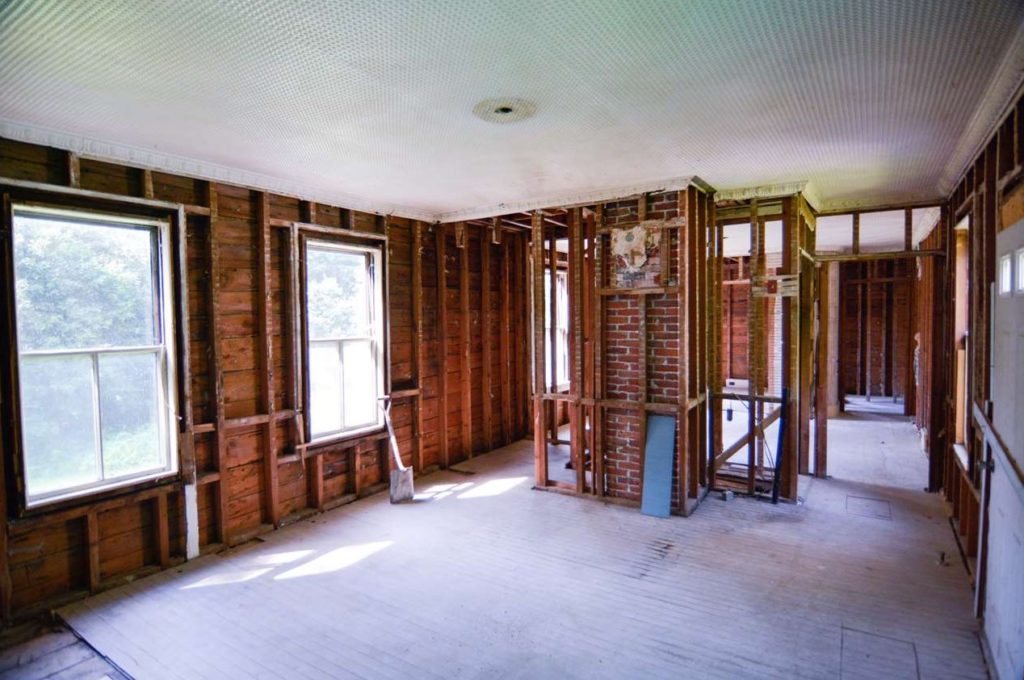
Some of the wiring was old, but at least the old cloth-insulated wiring was long gone. That was a relief, since it tends to crumble when you disturb it.
I half expected to find remnants of old-knob-and-tube wiring—probably not still connected, but a common artifact of earlier renovations. Eventually I found some, hidden behind the tinned ceiling of the dining room.

We couldn’t live in the house, but we also couldn’t cover the combination of rent for our Cambridge apartment, the house mortgage, plus renting a place to live up here during the renovation. We considered tracking down a used camper, but finally settled on a tent.
I expected to up here alone most of the time, with Linda coming up for a monthly weekend. She had other ideas, especially after the pandemic hit, and wanted to be here as much as possible. That meant setting up for the two of us.
Given the local wildlife—especially raccoons and black bears—cooking in the tent was not an option. We set up a cook shed instead, planning to repurpose it eventually as a garden shed.
Without running water, we would have to make regular runs to my mother-in-law’s summer cottage, about ten minutes away. So, water we could manage. What we would need was a bathroom set-up. In the absence of plumbing, a compost toilet would have been ideal, but too expensive for short-term use. Instead, we chose a chemical toilet. More on that later.
Here’s what we did.
The Platform
The land behind the house is not level in any direction. We would need a platform of about 32’x34’ that could support not only the tent, but also the cook shed. It would have to be at least roughly level. Even a slight pitch of less than 5° would be adequate. Since it wouldn’t be permanent, it could just be square rather than the actual shapes of the structures it would support.
Squaring Up
“Squaring up” means making your corners all 90° to form an accurate square or rectangle—or in this case, a rectangle with a bump-out to accommodate one wing of the tent.. For a small project like assembling door jambs, I would use a framing square to initially square it up, then confirm by measuring diagonally. (For any square or rectangle, if you measure diagonally between two corners, and then again between the other two corners, the object is squared up when the two measurements are the same.)
For a larger project, a framing square isn’t all that effective. So, like most carpenters, I use what is known as the 3-4-5 Triangle method—a practical application based on the Pythagorean triangle.
It goes like this: Think of one corner of your frame as forming a triangle.
Measure 3’ from one corner out onto one leg of that triangle. Then measure 4’ from the same corner out onto the other leg. Finally, measure between the 3’ and the 4’ marks.
If that third measurement is 5’, you have your 90° angle. If the third measure is off, you’ll need to adjust the position of the two other legs of the triangle until it’s correct.
You can also use multiples of 3-4-5, such as 6-8-10, 9-12-15, or even 300-400-500, so long as each number you use is the same multiple of 3, 4, and 5. In fact, the higher the multiple you use, the more accurate the 90° measurement will be. Here’s what it looks like in practice:
Joists, Rim Joists, and Leveling
From where I planned to put the northeast corner of the platform, the ground slopes downward both to the west and to the south. By the time you get to the diagonally opposite southwest corner—a diagonal of about 48’—the ground drops about four and a half feet.
That meant that one corner of the platform would literally sit on the ground, while the diagonally opposite corner would have a four-and-a-half-foot drop.
So, at the same time as I was squaring the beams into the different sections of the platform, I had to be sure that each section was also level.
Using doubled-up 2x4s as as the joists (and the 3-4-5 method), I assembled all five of these beams and laid them out on the ground.
I added the first length of the rim joist—again using doubled 2x4s, and assembled the rest of the rim joist as I went along. That way, I didn’t have to try leveling two unwieldy beams at the same time.

Starting at the northeast corner of the first frame, I put a jack underneath the first beam about 2/3rds down the length. I then jacked it up until the beam as a whole was level.
I next installed 2×4 posts about every 5-6 feet under the leveled beam, putting a 1’x1′ plywood “pad” under each post to keep it from sinking into the ground.
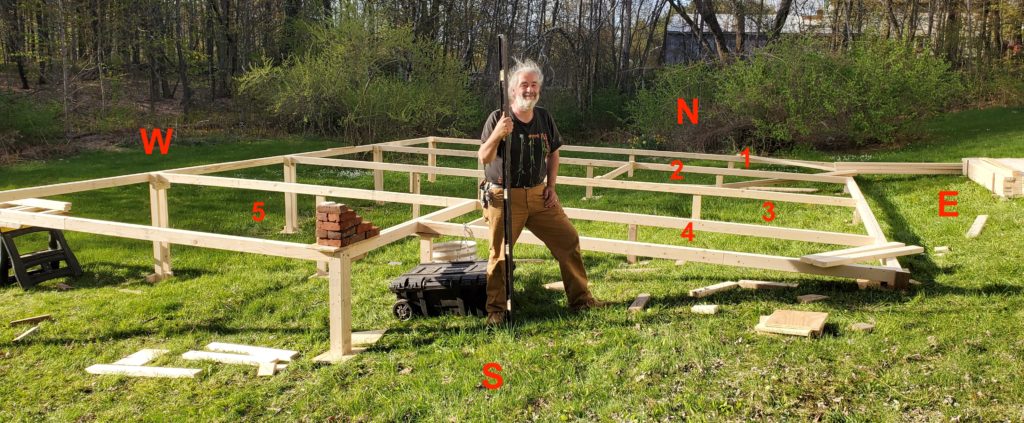
Then I attached the rim joists along the east side and leveled those. I added to the rim joists and attached connecting beams, leveling as I went.
Spacing
To stabilize the frames and to support a floor on them later, I need to add evenly spaced joists. But spacing joists (and studs) is a boring, repetitive task—especially if you have to measure and mark for each one. Furthermore, I was working alone, which meant having the additional task of trying to fasten one end of the stud to the joist, while holding up the other end and trying to get the correct spacing. So, I built a jig.
Jigs are devices that you lay over the object you are making, to act as a guide for the tool you are using to shape it. Jigs allow you to produce identical dimensions in repetition work.
More than any other tool or technique in the woodshop, jigs and fixtures demonstrate the “bottom-up” aspect of woodworking; that is, it is a truth that the majority of woodworking devices created result from woodworkers solving a problem on the the floors of their shops: It could have been seeing that a single-edged chisel would be made more efficient by having a series of edges, and thus the first multi-toothed hand saw was conceived. Or, by filing a profiled-edge on a plane’s iron, and creating a decorative molding. And a multitude of other ideas about doing a woodworking operation more efficiently, more safely, etc.
R.A. Salaman, Dictionary of Woodworking Tools, ca. 1700-1970, and Tools of Allied Trades.
Anyone that knows me would not be surprised that I made a jig. I’m a bit of a jig junkie. In this case, it was a simple one, made from scrap pieces of 2x4s, cut to two 14-½” lengths. The point was to end up with consistent 16” On-Center, or “OC” spacing.
The practice of OC probably originated when rough-sawn framing materials were used—that is, lumber cut from a log while still wet, and allowed to dry and shrink naturally. The resulting wood could vary in thickness and width. Measuring from the centers of the different pieces was more likely to give consistent spacing.
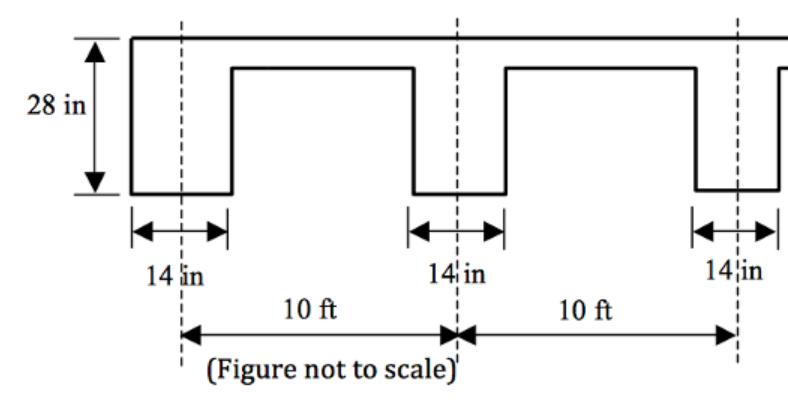
OC, or O.C., means “On Center.” Framing materials, along with other construction elements, may require a specific spacing between them. Often, this is the maximum spacing you are allowed by building codes. Any more, and the construction won’t be safe. To get this required distance, you measure from the center of one piece to the center of the next.
Old 2×4’s were typically at least 1-¾” x 3-¾”. But that depended on how much they had shrunk, and how generous the millwright was with his original cuts. In contrast, modern lumber is planed and cut to consistent widths and thicknesses after drying. For instance, a modern 2×4 measures 2” x 4” when cut wet from the log. It’s then placed in a kiln to dry and shrink. Finally it’s milled to a near consistent 1-½” x 3-½”, or what is referred to as a “nominal” 2×4.
Either way, the use of OC is the best way to get even measurements between your studs.
To make my jig, I attached my two pieces of scrap plywood to a third piece, spacing the two 3-⅛” apart so the jig would straddle my beams. I beveled off most of one end to make it possible to rotate the jig out of position once I attached the next joist. To make things even easier, the two pieces of scrap angle iron supported the joist while I screwed it into place.
Make a pair of them to hold and space each end of the joist. Now you have two free hands—one to hold the impact driver and one to position the screws—which happened to be exactly how many free hands I needed. Funny how that works out.


As Salaman says, jigs usually resulted from the need to solve an on-the-spot problem simply and inexpensively. To which I would add my favorite woodworking expression: “Work smarter—not harder.”
Here’s the final platform frame:

Surfacing
And here it is (almost completely) covered with a surface of Oriented Strand Board (OSB), a construction-grade exterior particle board. This stuff also has a 200-day guarantee not to need sanding before you add other layers. At the end of the summer, I’ll take it all apart and use the wood and the OSB in the house and barn. Everything is to be repurposed. Yes, I show tendencies of being an Old School Yankee.

The Kitchen Shed
Okay. Now we come to the one part of the process that had me cussing and holding back from throwing things. The shed.
Believe it or not, we did a fair amount of research for this one. The idea was to have a summer kitchen that we could later turn to a different purpose. For those of you who might want to know, we picked an Arrow Woodridge 10 ft. W x 8 ft. D Wood-grain Galvanized Metal Storage Building. Not cheap, but we figured we could use it as a garden/tool shed.
We combed through the customer reviews, some of which complained that the screw holes didn’t always align. Not a big deal when using sheet metal screws.
Others noted that the shed might take longer to put together than the manufacturer suggested. No surprise there. Manufacturers frequently underestimate assembly time, because the people they rely on to generate that metric have already assembled earlier versions of the product during development. They have usually worked the kinks out of their technique.
Talk about understatements.
We laid out the parts.

That much went smoothly. Things went quickly downhill from there (and there was no way to jack up or level that one!).
I’m usually pretty quick to figure out direction, often not needing to look at them. After all, I have been building things since I was old enough to hand my father nails.
Not this time. Not only did the screw holes not line up; the instructions were dense and hard to follow, often requiring three or four readings to figure out what they were talking about.
This is me, calling a timeout to try to figure out a next step (and this after we were almost finished):

Once we were finally done, Linda captured my feelings at that moment:

Still and all, the shed has worked reasonably well as a summer kitchen—as long as you don’t try going in at the height of the heat. (Really should have thought that one through!)

There is plenty of room for the equipment and supplies we need. Linda, who has loved cooking since childhood, finds the arrangement gives her a fairly wide scope.
By the way, that’s a fish-cleaning sink on the left. Eventually I’ll use it for actual fishing!
The Tent
We wanted a tent big enough for both of us to live and work comfortably for a five-month period. It had to be able to withstand the full spectrum of New Hampshire weather from spring into fall, and be durable enough to later re-use when family groups visited.
After researching all the variables, we chose the Ozark Trail 20-Person 4-Room Cabin Tent.*

(Of course, “twenty-person” refers to how many people can cram in when rolled up in sleeping bags.)

Linda and I put up the tent together. It was a two-person job, but was straightforward and went quickly.
Like, from this:

To this:

As you may have noticed, Linda is almost never in these pictures, since she’s usually the one taking them. She wanted this one to include her, to show that she really is working alongside me for at least some of the tasks!
This isn’t our video, but it gives you an idea of what the interior looks like before you add the top cover:
The Privy
No need to dwell on the details. Without plumbing, we had to go with a chemical toilet. For those who want to know, we got a Thetford Porta Potti, and have found it works quite efficiently.
Still, as Linda now says, “Although I’m grateful that good chemical toilets exist, I also have a new and lasting appreciation for the ones that flush.”
I see it a little differently. As a former Marine, I can’t begin to recall how many times my privy was an e-tool (folding shovel), along with the little (and I do mean little) packs of toilet paper that came in our MRE’s (Meal Ready to Eat). By contrast, this was luxury.
For privacy, I built a temporary enclosure. I couldn’t resist adding the crescent moon. Our next-door neighbor—also named Devon—later told us that, in his grandparents’ day, the men’s outhouse had a sun, and the women’s, a moon. We only got one chemical toilet, so I used Linda’s outhouse when she isn’t looking.
Once that was done, the camp was finished enough to move in for our summer sojourn.


Resources
If you’ve never seen cloth wiring, you can take a look here: “Understanding, Recognizing And Removing Cloth Wiring: Your Comprehensive Guide?”: https://www.whittinspections.com/homeowner-resources/cloth-wiring
For more on framing squares, check out: “STEM On The Job: The Framing Square”: https://www.followthevoyage.com/node/1977
Also: “How To Use A Framing Square—Ask This Old House”: https://www.youtube.com/watch?v=Xt2q-lRdzQc
For a more detailed explanations of the 3-4-5 Triangle Method, check out: https://www.aconcordcarpenter.com/the-3-4-5-method-for-squaring-corners.html
Also: “How to Use the 3-4-5 Rule to Build Square Corners”: https://www.wikihow.com/Use-the-3-4-5-Rule-to-Build-Square-Corners
I’m a tool nerd, so I’m drawn to books like this R. A. Salaman’s Dictionary of Woodworking Tools, ca. 1700-1970, and Tools of Allied Trades Newtown, CT, U.S.A. : Taunton Press, 1975; rev ed.1990: https://www.amazon.com/dp/0942391519/ref=olp_product_details?_encoding=UTF8&me=
For examples of basic woodworking jigs, take a look at this collection: https://www.familyhandyman.com/list/dirt-simple-woodworking-jigs-you-need/
* At the time of this posting, we have no connection of any kind with any of the companies that manufacture products we talk about.
Carolina Nve Diaz San Francisco
Thank you so much for sharing your experiences with us.
I am loving it!
Linda’s pictures, Devon’s narratives and his excellent skills put a smile on my face.
This is definitely so different.
I can see your happiness. And this new home of yours is a wonderful paradise.
Keep it up. Your project encourages me greatly to appreciate life and love and to keep moving forward.
Thank you.
Carolina
Linda Barnes
Thank you, Carolina. For us, it is a reminder that it is more possible than we might have imagined to start something new. Hope all is well with you!
Estelle
Thanks Devon! Super interesting.
Donene
I can hear your voice as I read this Devon. What an adventure! Thank you for creating this blog so we can follow the progress.
LAURA W.
This is FABULOUS and so interesting to see not only the house project but how you are living during the renovation. Linda, you look so wonderful and relaxed and joyful! It is great to see and I am so glad that you have been able to be up there with Devon during this interesting and exciting time for you both! Sending you my very best and please stay wonderfully happy and at peace!!! Prayers and hugs for you both and of course for Florence! Laura
Linda Barnes
Laura, thanks so much for keeping up with what we’re doing. Really lovely to hear your thoughts—thank you, and abrazos to you and yours!
Talitha
Just catching up now, as I was able to get a verbal update of the goings-on from Linda a while back. This is awesome. The property and house remind me of a place I lived in when I was 11 years old, 250 acres in West Virginia. Great memories. Thanks for taking us along on your adventure!
Linda Barnes
I’m not sure quite sure how to explain it, but since the first time we went to the house, it has always felt like a place I’ve known before.